
I had the pleasure of opening up my craft room these school holidays for a group of four young girls, aged 8, to spend an afternoon learning about the basics of card making. I thought I would share here how I curated the class and how it all went on the day, so you might feel inspired to invite kids to your craft space too.
I have taught classes for adults at my local store for the past couple of years which has been a huge learning curve. Those adult classes are heavily technique based, so the class attendees can take the skill and apply it in their own craft space. Teaching kids is a whole new proposition I noticed however! The kids want to have the fun of learning a new skill, not necessarily to go home and make more, because for them this is considered simply a fun activity. However, hopefully they would want to come back and make more with me again some time.
I think one of the most appealing things about making cards from a beginner’s perspective is that splash of colour, the ease in which you can have beautifully cut shapes and letters, stamping cute images, adding sparkle and pretty finishing touches. That’s all before you realise you can share the fun by sending your creation along to a friend or loved one!

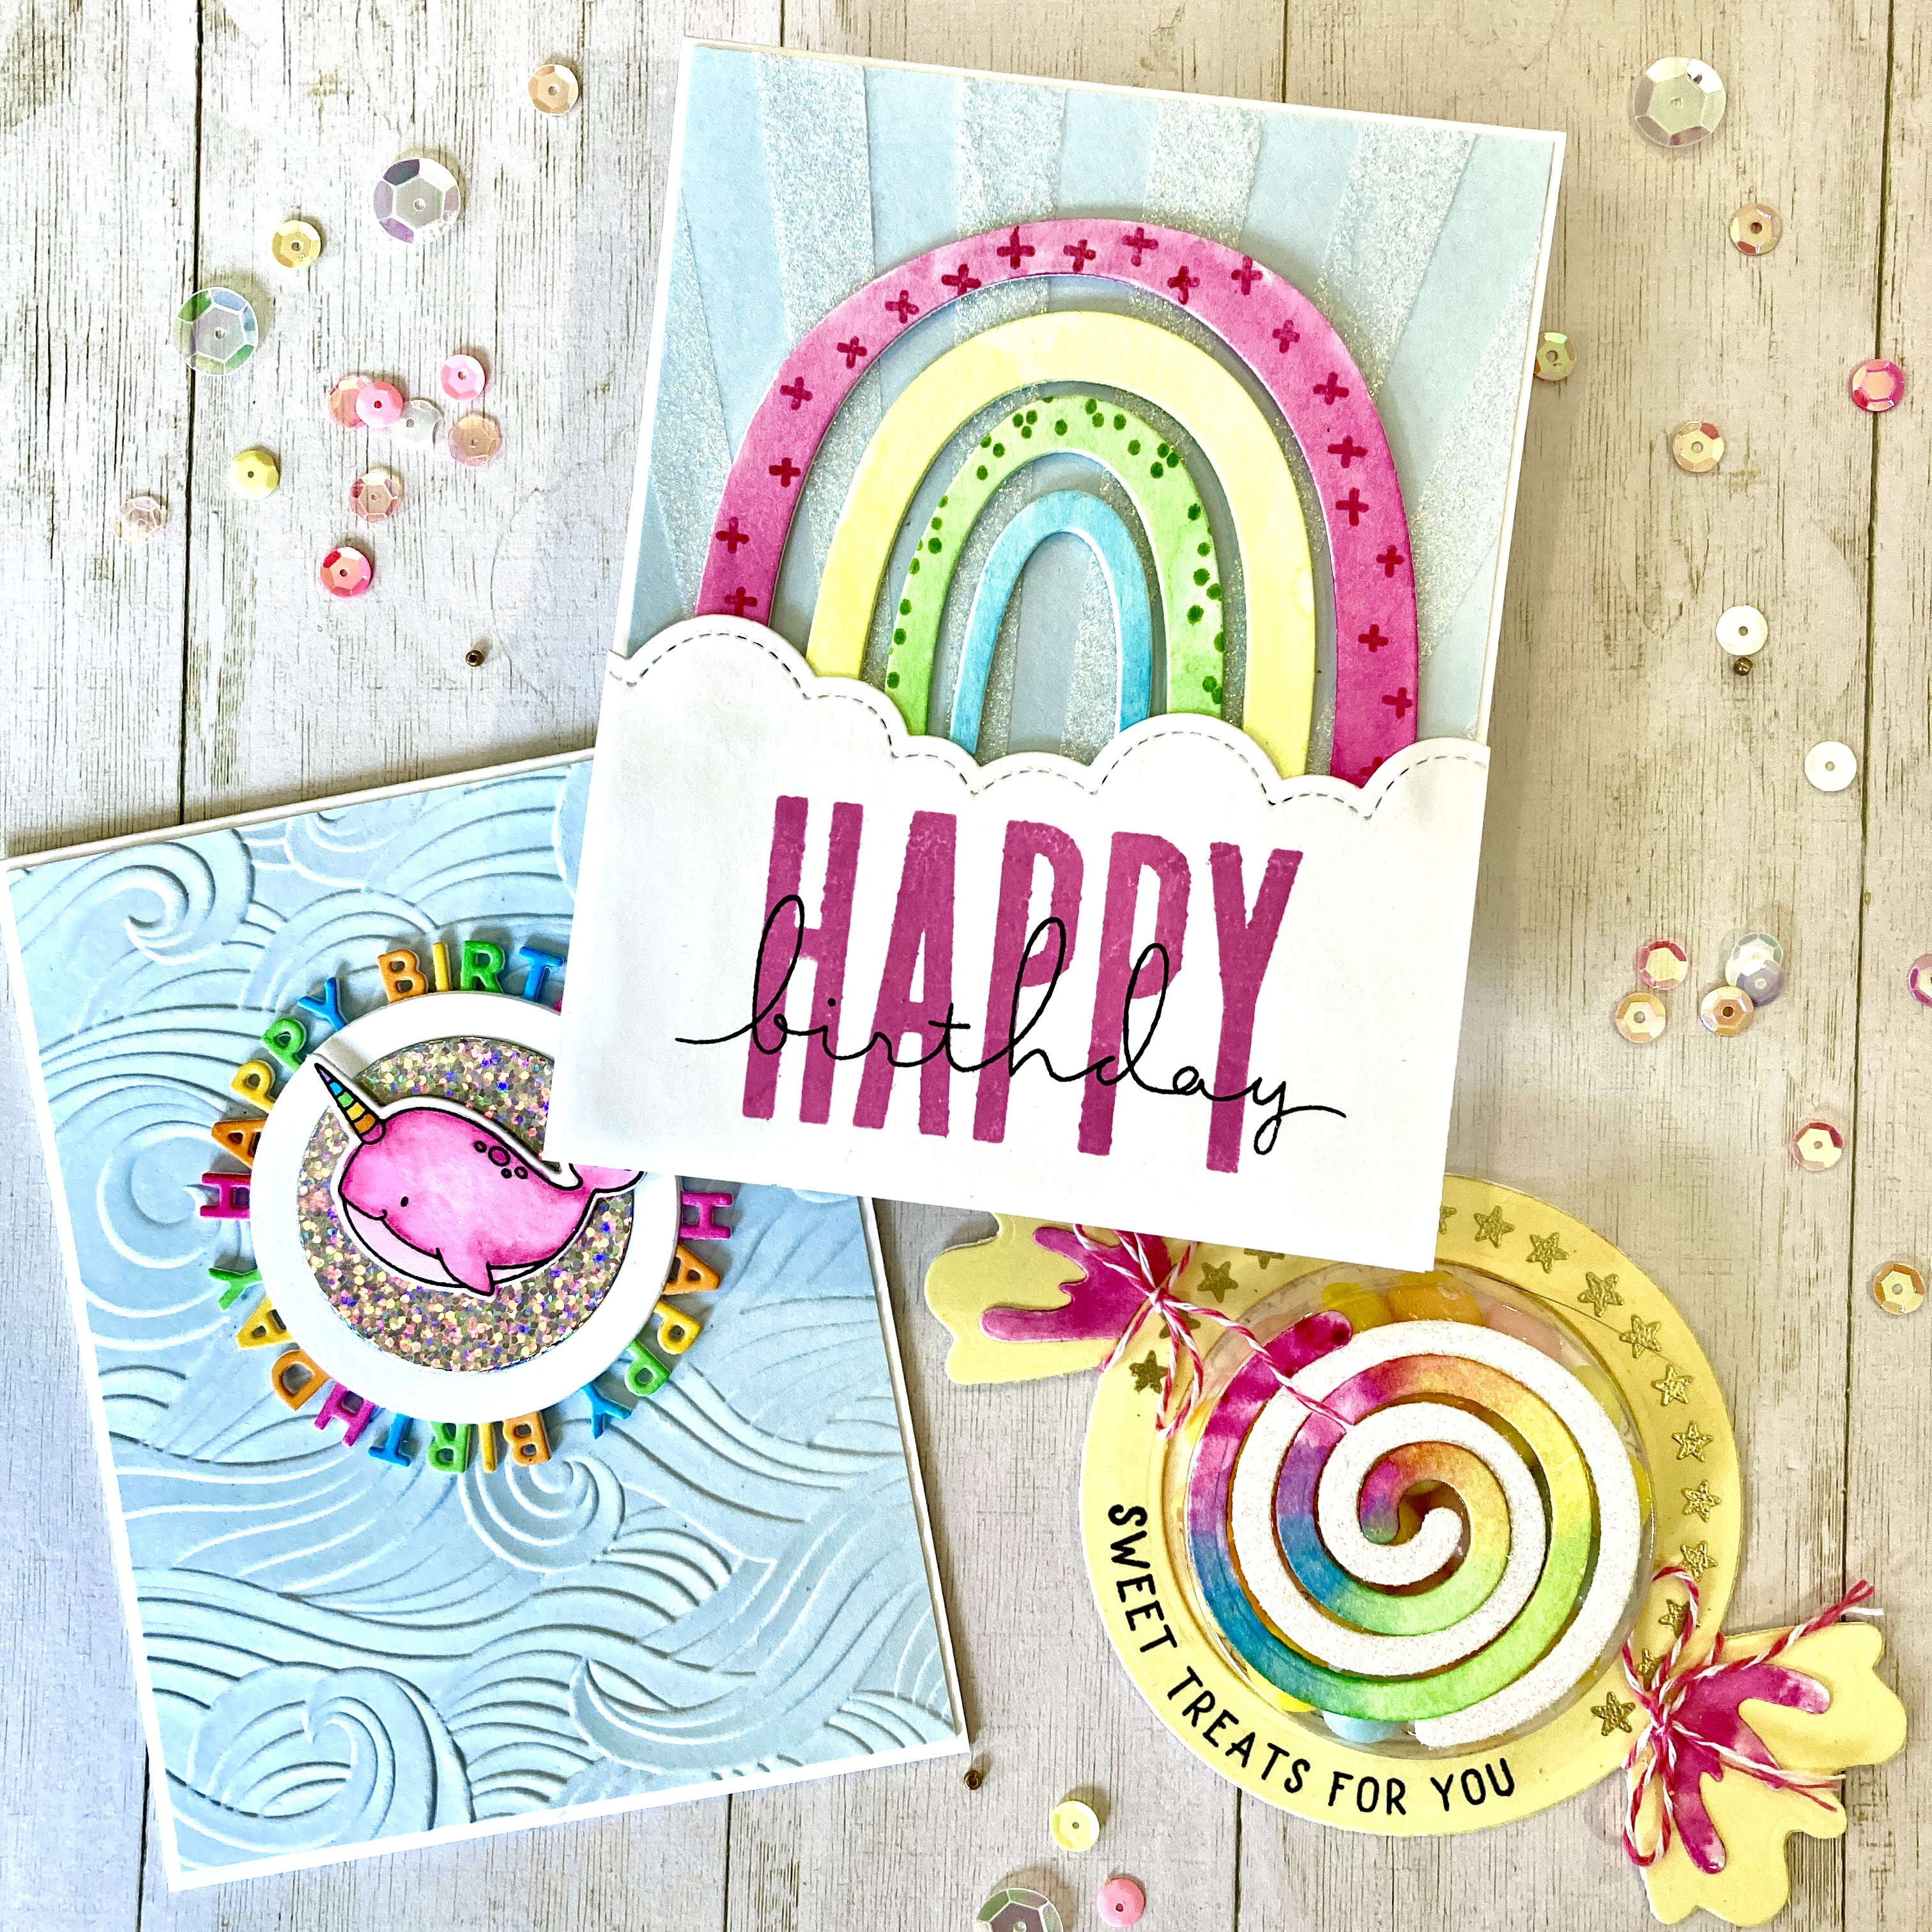
Having thought about what might appeal to young girls to make up as cards, I settled on a rainbow with pink tones, a card with an embossed background together with a simple coloured image, and the most appealing thing of all – sweets! What kid can say no to candy? In fact, there was MUCH debate during the class about who they’d give their cards to, but they were unanimous in the intention of sending the candy treats to themselves!
Basic skills covered in class were die cutting, stencilling with glitter paste, stamping with both black and coloured inks, watercolour painting die cuts, copic colouring a simple image and a die cut, and embossing a card panel. Sounds like a lot doesn’t it? You are right.
Prep, Prep, Preparation is Key
I wanted the girls to actually experience the ‘doing’ of certain skills, so I chose components of the cards that I thought they would enjoy seeing come to fruition, that were important steps in the process. I really wanted them to have the satisfaction of creating art and seeing their work come together in their finished projects.
At the age of 8, the girls are more than capable of achieving most steps of the card creation. Preparation of their kit did include die cutting many components, trimming cardstock to the correct size, pre-stamping some things where I could, simply because of time constraint and trying to ensure the pace of the class didn’t make them feel overwhelmed or (worse!) bored.

Here’s a photo of what was contained in their kits. The larger pieces include two Neenah Classic Crest Solar White #110 card bases, two card fronts in Bazzill Icy Mint (one was trimmed down to 5 3/8 x 4 1/8″, the other was a standard 5 1/2 x 4 1/4″), a Bazzill Sour Lemon piece large enough for The Greetery candy top, a white candy bottom including the ripper circle and a Lawn Fawn stitched cloud edge panel.
The smaller components include Taylored Expressions rainbow pieces, The Greetery candy spiral and candy ends in watercolour paper, a second candy spiral in white sparkle glitter paper, three Happy Birthday circle die cuts and a stamped Narwhal image from My Favorite Things, a white circle to fit onto the Happy Birthday circle, and holographic circle cut slightly smaller. Finally, a plastic bubble for their candy pop was included – they are 1/2″ deep, 2″ in diameter, purchased from either The Greetery, Simon Says Stamp, or Papertrey Ink.
Craft Room Set Up
My craft room is my dining room generally – handily close to the kitchen for snacks lol, and clean up (tour it here for a better view and even some storage inspiration). I often have friends over to ‘play’ and we have craft dates, plus my own daughter Amélie loves to join in with crafting sometimes.
You can kinda see I have my table generally in the centre of the room (pushed a little towards one corner today to allow more space for me to get around the occupants at the table). I use my TV for Youtube (i.e. Jennifer McGuire!) and having movies/TV shows on in the background whilst creating. I did cast a photo via Google Photos of the cards we were doing so the girls could see them clearly without risking the actual cards amongst the mess.

There is enough space at my table for four participants. I ended up with four paying participants, so Amélie had to step aside and become an official helper on the day (which she happily did). She is just 7, and a very keen cardmaker, so we did a special session the night before where she created the cards for herself, and therefore knew how to help on the day.
Actually it was great we did that, because based on that session, there was a step in the process I decided to skip entirely (heat embossing – thought I’d save that for another day), and I realised if some of the more fiddly glueing was done, that would save A LOT of frustration (and glue I imagined) at the end, without taking away from their learning. (I like to stack die cuts on my cards, so pre-glueing a few components definitely saved some time).

Each girl had a wee tray with their kit (I use these little square trays in my adult classes too and they are invaluable for keeping small pieces contained and saves mixing kit bits up with their neighbours.
They also had a little plastic paint palette with a dab of each of the four colours of Nuvo Shimmer powders, a cup of water and a paintbrush.
I also had a box of selected Copic markers and a pack of baby wipes in the centre of the table – we certainly went through those!

I placed stamps into various stamp platforms lined up on my cabinets ready for them to stamp. I felt that using acrylic blocks would result in mistakes and frustration for young beginners (for adults I always get them to stamp with an acrylic block first before introducing them to a stamp platform).
I had pairs of stamps set up for the Happy Birthday on the rainbow card, the sentiment and stars for the candy pop, and decorative stamps for the Rainbow pieces. We ended up not stamping the rainbow decorations in the end, mainly because the girls painted their rainbows in various colours rather than simply copying mine (which was awesome, but didn’t match my stamping ink! ).
The Projects

For the Rainbow Card, I thought the girls would really enjoy stencilling with glitter paste (like, who wouldn’t??). I pre-taped the stencil with painter’s tape, so all they had to do was line it up over their light blue piece of cardstock, press it down onto their mat and gave them the spatula. They really did quite well, and I simply swiped up the excess paste with the Stencil pal, giving them the smooth final finish and returning excess paste to the jar. They lifted the stencil and passed it on to their neighbour. I actually had two very similar MFT stencils, so this process went reasonably quickly. Stencils and spatulas were dumped into the kitchen sink for clean up.
They then painted the pre-cut pieces from watercolour paper (the rainbow, plus the candy pop swirl and ends).


We used Nuvo Shimmer Powders to paint with – something different from the standard kids’ paint palettes they may have been used to in their own art collection. Nuvo Shimmer Powders are great because the colours are bright and vivid with immediate results, they are shimmery, a little powder goes a long way and they can learn to darken or lighten the colour with water as they desired. They even got bold and mixed colours, resulting in some fun rainbows.

After they had fun stencilling and painting and all those pieces were set aside to dry, we moved on to adding colour with markers. I chose a simple image and a pair of light and dark copic pens for them to learn to add a little basic shading. Narwhals of various colours emerged here too.
I had pre-glued the fiddly Happy Birthday circles together to create a stacked element. They just had to add colour to the letters in whatever palette/pattern they wanted – some very pretty pastel rainbows came out!


They die cut the Narwal image with the matching die – those who got a bit carried away with their colouring were relieved they still had a cute image once cut, and one girl was particularly happy hers still had that white edge, just like my sample.

They had a yellow piece of cardstock in their kits, and they die cut the top half of the candy piece – I had the two dies taped together to cut the main shape and the circle window at the same time.
They then stamped the sentiment with black ink, and some stars with Delicata silver shimmer ink with stamps already set up in the two stamp platforms.
They also stamped the Happy and Birthday onto the cloud panel for the rainbow card set up in the other two platforms. (Be prepared for a bit of a clean up of stamps later!)
Lastly, I had the Big Shot set up so they could send their second (slightly smaller) pale blue piece of cardstock through with the Memory Box Waves Embossing folder – they were thrilled with the ease and amazing result they got!

The main rush of ‘doing’ was over, we had pretty much completed all major components and they were able to settle in and glue things together. All of the above had taken around an hour and fifteen minutes, so I was feeling pretty confident that we were going to complete everything within the 2 hour window I was aiming for – despite various visits from my two nosey dogs distracting the girls who wanted to cuddle them desperately! Motivation was retained by reminding them about the Skittles Smoothies I had to fill their candy bubbles!
I let the girls loose with my Art Glitter Glue (I would recommend decanting your glue into four smaller bottles with fine tips, I just happen to have a ridiculous amount of this glue as it is a fave, and used in my adult classes all the time). They quickly learned they didn’t need much, and that they could control the flow with the fine tip quite well. I gave them the option of not stacking their rainbow die cuts to save a step, but they saw the difference having that stacked dimension gave, and all four chose to do that extra little bit of work for an improved final result.

I didn’t really need to have much input apart from encouragement after that – they happily referred to the photograph of the cards and candy pop on my TV screen so they could all see what the finished product should look like. In the end, all their projects were almost exact replicas apart from some small colour choices of their own that they had made at the start.
We were all done comfortably within the allotted 2 hour time slot, and the girls went home with their finished projects – still talking about who’s birthday was next coming up and when they’d eat the treats!
Argh, I didn’t manage to get a photo of the final results of the other girls’ projects in the excitement of finishing, tying of strings, hugging of dogs and the arrival of mums and aunties – but rest assured, they were amazing!
OK, a summary of advice:
- keep the projects reasonably simple but not too basic;
- stick to a simple, vibrant colour palette;
- some of the ‘wow factor’ elements really are the simplest – embossing, die cutting and using quality products to get quality results;
- pre-cut, pre stamp, pre-glue things that are time consuming where possible – let their time be spent doing the fun stuff;
- allow for individuality – colour or layout choices for example – and a little experimentation (kids love trying things out!);
- a two hour class is probably the absolute maximum time you’ll keep their attention.
Thank you for taking the time to visit! I hope this post inspires you to encourage young people to craft too.
For more in-depth information about the best value supplies for your craft table, from cardstock to the handiest tools, check out my Best of the Basics series.
Articles in Best of the Basics Series:
Adhesives Cardstock Ink – Stamping Die Cutting Machines/Trimmers Heat Embossing Colour Handy Tools
Follow me on my social media channels: