I’m not usually a floral type person – I don’t even do gardening! But this new Altenew stamp and its matching die just looked too amazing to not have in my stash.
I had a go at no line watercoloring – there are so many inspiring cardmakers and artists out there showing beautiful images with this technique and I really wanted to join the trend.
Quite pleased with my progress so far!
I used Fuschia, Tangerine, Lemon Yellow, Lime Green, Chartreuse, Terra Verte and Sepia Color Burst powders.
Progress pictures!
I stamped the image with Gina K Whisper amalgam ink and I used Ken Oliver Color Burst powders for my painting. Colour Bursts often come in packs of 6, but your local store may have them singularly for retail.
I painted it a small section at a time – putting water down first, picking up the powder with my brush and letting the water do most of the blending for me. The flowers ended up a little darker than I anticipated, so that is something to practice next time. I spent the better part of an evening painting this image, but it was well worth taking the time!
For the card front, I used a piece of cardstock from my stash which is not quite Kraft, but not quite grey either – it’s called Concrete Grey and I found it in my local stationery store. I’ll link to it below for your reference.
I had some matte gold frames leftover from a previous project – the Altenew Fine Frames cover die cuts a bunch at one time – and I selected an appropriate sized one for this card.
I heat embossed the sentiment from the same stamp set just inside the frame. I cut the flower out with its matching die and attached it with foam tape which gives it just a little lift from the card front.
The card base is Gina K Designs Grass Green – such a delicious colour! Gold gems from Pretty Pink Posh complete the card front.
This completes my card today. Thank you for stopping by! Below are links to the products I have used – some are affiliate links (not all) which simply means I may get a small commission at no extra cost to you when shopping. Thank you for your support – it means I can keep creating and sharing with you.
Welcome! Today I am excited about a product in my stash which I want to share my success in using it with you – including the resulting cards. Plus, right at the end is my giveaway for you to enter – GIVEAWAY CLOSED – Winner: Grace W, NZ
We all have those dies in our collection – we saw something pretty and bought the intricate die thinking of all the amazing cards to be made. Only to discover yes they’re pretty, but also pretty labour intensive to get a complete and nice cut! I like to stack my die cuts too, making some of the card making processes verrrrry frustrating! I have constant battles with those little ‘ripped out’ corners or having to carefully run through again and again, and simply untidy edges after all the effort. Maybe it’s my cardstock? Do my plates need replacing?? Perhaps I need a whole new machine??? Or maybe it’s just me………?
I have to admit, I purchased the electronic BigShot Express earlier this year and I’m definitely loving it – it has handled intricate dies quite nicely, but now I have found something to really make intricate die cutting a BREEZE.
The Sizzix Chrome Precision Base Plate
It’s like a bright shiny mirror straight out of the package and I was hesitant to scratch up that pretty surface. However, I needed a pretty die cut for a card idea and I knew from past experience that there were a couple of tricky spots so I thought I’d try it out on the Chrome Plate. Well. One pass and all the little pieces just FELL OUT when I ran my fingers over them – didn’t even need my pokey tool. WOW.
So this morning, I got out the worst culprits when it came to die cutting – very intricate background dies from Avery Elle (waves), Crafter’s Companion (clamshell) and Simon Says Stamp (Heart Mandala). DISCLAIMER: There is nothing wrong with these dies, they just needed an extra shim, or a few extra passes through my machine to get allllll the pieces out.
The Sizzix globe is featured here, but I didn’t have time to turn it into a card today.
The Heart Mandala pieces came out so easily!
I ran them through on the chrome plate – out of habit I did two passes on my manual big shot – but I got the amazing result of the pieces simply falling out when I ran my fingers over them.
I haven’t even told you the best part – the chrome plate is just as shiny and perfect as when it came out of the packet – there are no scratches or indentations from the die cutting. WOW again!
PLEASE NOTE: The Chrome Precision plate cannot be used with the Big Shot Foldaway or Big Shot Plus. Also, it should only be used with intricate dies rather than those with large openings.
OK, I then had the fun of creating cards, so here’s what I did.
A distress oxide background and the Avery Elle Waves die.
Alcohol inked background with the Crafters Companion Clamshell die
Alcohol inked background piece with the SSS Heart Mandala die
I carried on die cutting my card front pieces.- each one is stacked at least twice, the SSS Heart Mandala is stacked three times.
I cut the Waves from a piece in my stash – I had a previous failed attempt with watercoloring using Nuvo Shimmer Powder Atlantis Burst, but it did result in a pretty coloured and shimmery piece, perfect for cutting up!
I used the Hero Arts Colour Layering Turtle along with the Thanks stamp and die sets. The turtles were stamped with a selection of mini ink cubes in my stash – I don’t own a complete collection of any particular line of inks and I have happily collected all sorts to experiment with. (I will link here to Jennifer McGuire’s ink swatching system to make it so much easier to select inks for colour layering from your own stash).
The blue turtle and seaweed are stamped with Catherine Pooler ‘It’s a Boy’, Gina K Designs Blue Raspberry and Ranger Cobalt Archival inks. The green turtle and seaweed are stamped with Altenew Bamboo, Gina K Designs Grass Green and Ranger Library Green Archival inks.
I fitted the turtles and seaweed on the card, stacked the Thanks with white and silver glitter cardstock and finished the sentiment with white heat embossing on a black strip.
The card is finished off with Studio Katia silver gems.
The Mermaid is from left over from my weekend of learning to colour darker skin tones in my goal to be more diverse in my card making (you can check out that blog post here). I thought she would look super cute sitting on the clamshell card front and I finished this card off with a sentiment from MFT Sweet Sentiments and Pretty Pink Posh Party Mix jewels in the openings – to match the colour of the alcohol inking behind.
PLEASE NOTE: I purchased my clamshell die from Simon Says Stamp fairly recently, but it doesn’t seem to be available anymore anywhere – my apologies if I got you excited about this die!
The Heart Mandala is quite a statement piece, and I kept the rest of this card nice and simple, by adding a silver and black birthday greeting and placed Studio Katia silver gems to finish.
That completes my cards today. Scroll down a little more for the GIVEAWAY portion of today’s blog! Below are links to the products I have used – some are affiliate links (not all) which simply means I may get a small commission at no extra cost to you when shopping. Thank you for your support – it means I can keep creating and sharing with you.
Thank you for visiting my fledgling blog! I have this prize of the Avery Elle Waves Background die featured above, a slab of Whittaker’s Milk Chocolate (made right here in my own home town of Porirua, New Zealand!) plus a bunch of my Christmas Gift Tags so you will be all set for the upcoming festive season.
To enter, please leave a comment and follow my blog by entering your email address below (email address required to contact the winner!)
Giveaway is open worldwide to anyone who is 13 years or over. This giveaway is not sponsored, administered or endorsed by Instagram, Facebook or WordPress. Your information will not be shared with any other party. Please be aware that shipping delays are inevitable due to the Covid-19 pandemic.
The prize draw will take place midday (NZT) on Saturday 20 June and the winner will be announced both here and on Facebook and Instagram.
I will do my best to contact the winner directly. If the prize is not claimed within 7 days, it will be redrawn on June 27, 2020 NZT.
If you are interested in card making fun, future giveaways, product reviews, where to get the best goodies or my upcoming classes please follow me on my social media channels:
I have taken a few colouring classes over the past couple of years, both free and paid, and a high priority was to learn to colour skin and hair. Here is a link to my Colouring Resources Page which contains links to classes and tutorials I have done and can definitely recommend.
Colouring people and other characters such as mermaids are super fun, but in light of recent events, it occurred to me that I had not yet extended my colouring palette to include people of different nationalities (or even a sun tan!). This is something I had always intended on sitting down and working out but hadn’t actually taken the time, which, when I think about it is very short sighted, as New Zealand is a very multi-cultural country! I hope that by doing this exercise I continue to have a more accurate and inclusive portrayal of people both in my own community and further afar.
Hair colours on the left, skin tone on the rightHair colours on the left, skin tones on the right.
This is a page from the free Markers 101 Class at Kit & Clowder (suitable for all alcohol marker types). There are many other little freebie classes and digital images, I definitely encourage you to visit the Kit & Clowder community – either via Facebook or their website.
I had previously coloured the top four images as part of my original class. I still consider myself a beginner colourist, and have only been practicing my colouring on small images and stamps for cards for around 2 years or so.
So I got my workbook back out, tried out some colour combinations and filled in my final decisions for the bottom two images. My goal for now is to get out of my comfort zone of reaching for my habitual choices of colour and really think about what I’m representing in my projects.
Now to flex these skills!
Pretty Pink Posh have very cute people stamp sets with simple line designs, they suit many card occasions, and they’re the ones I reached for today in order to practice my new combinations.
Another stamp set I regularly colour are the MFT Mermaids, so I decided to colour one of these up as well.
Close ups of the people I have coloured today
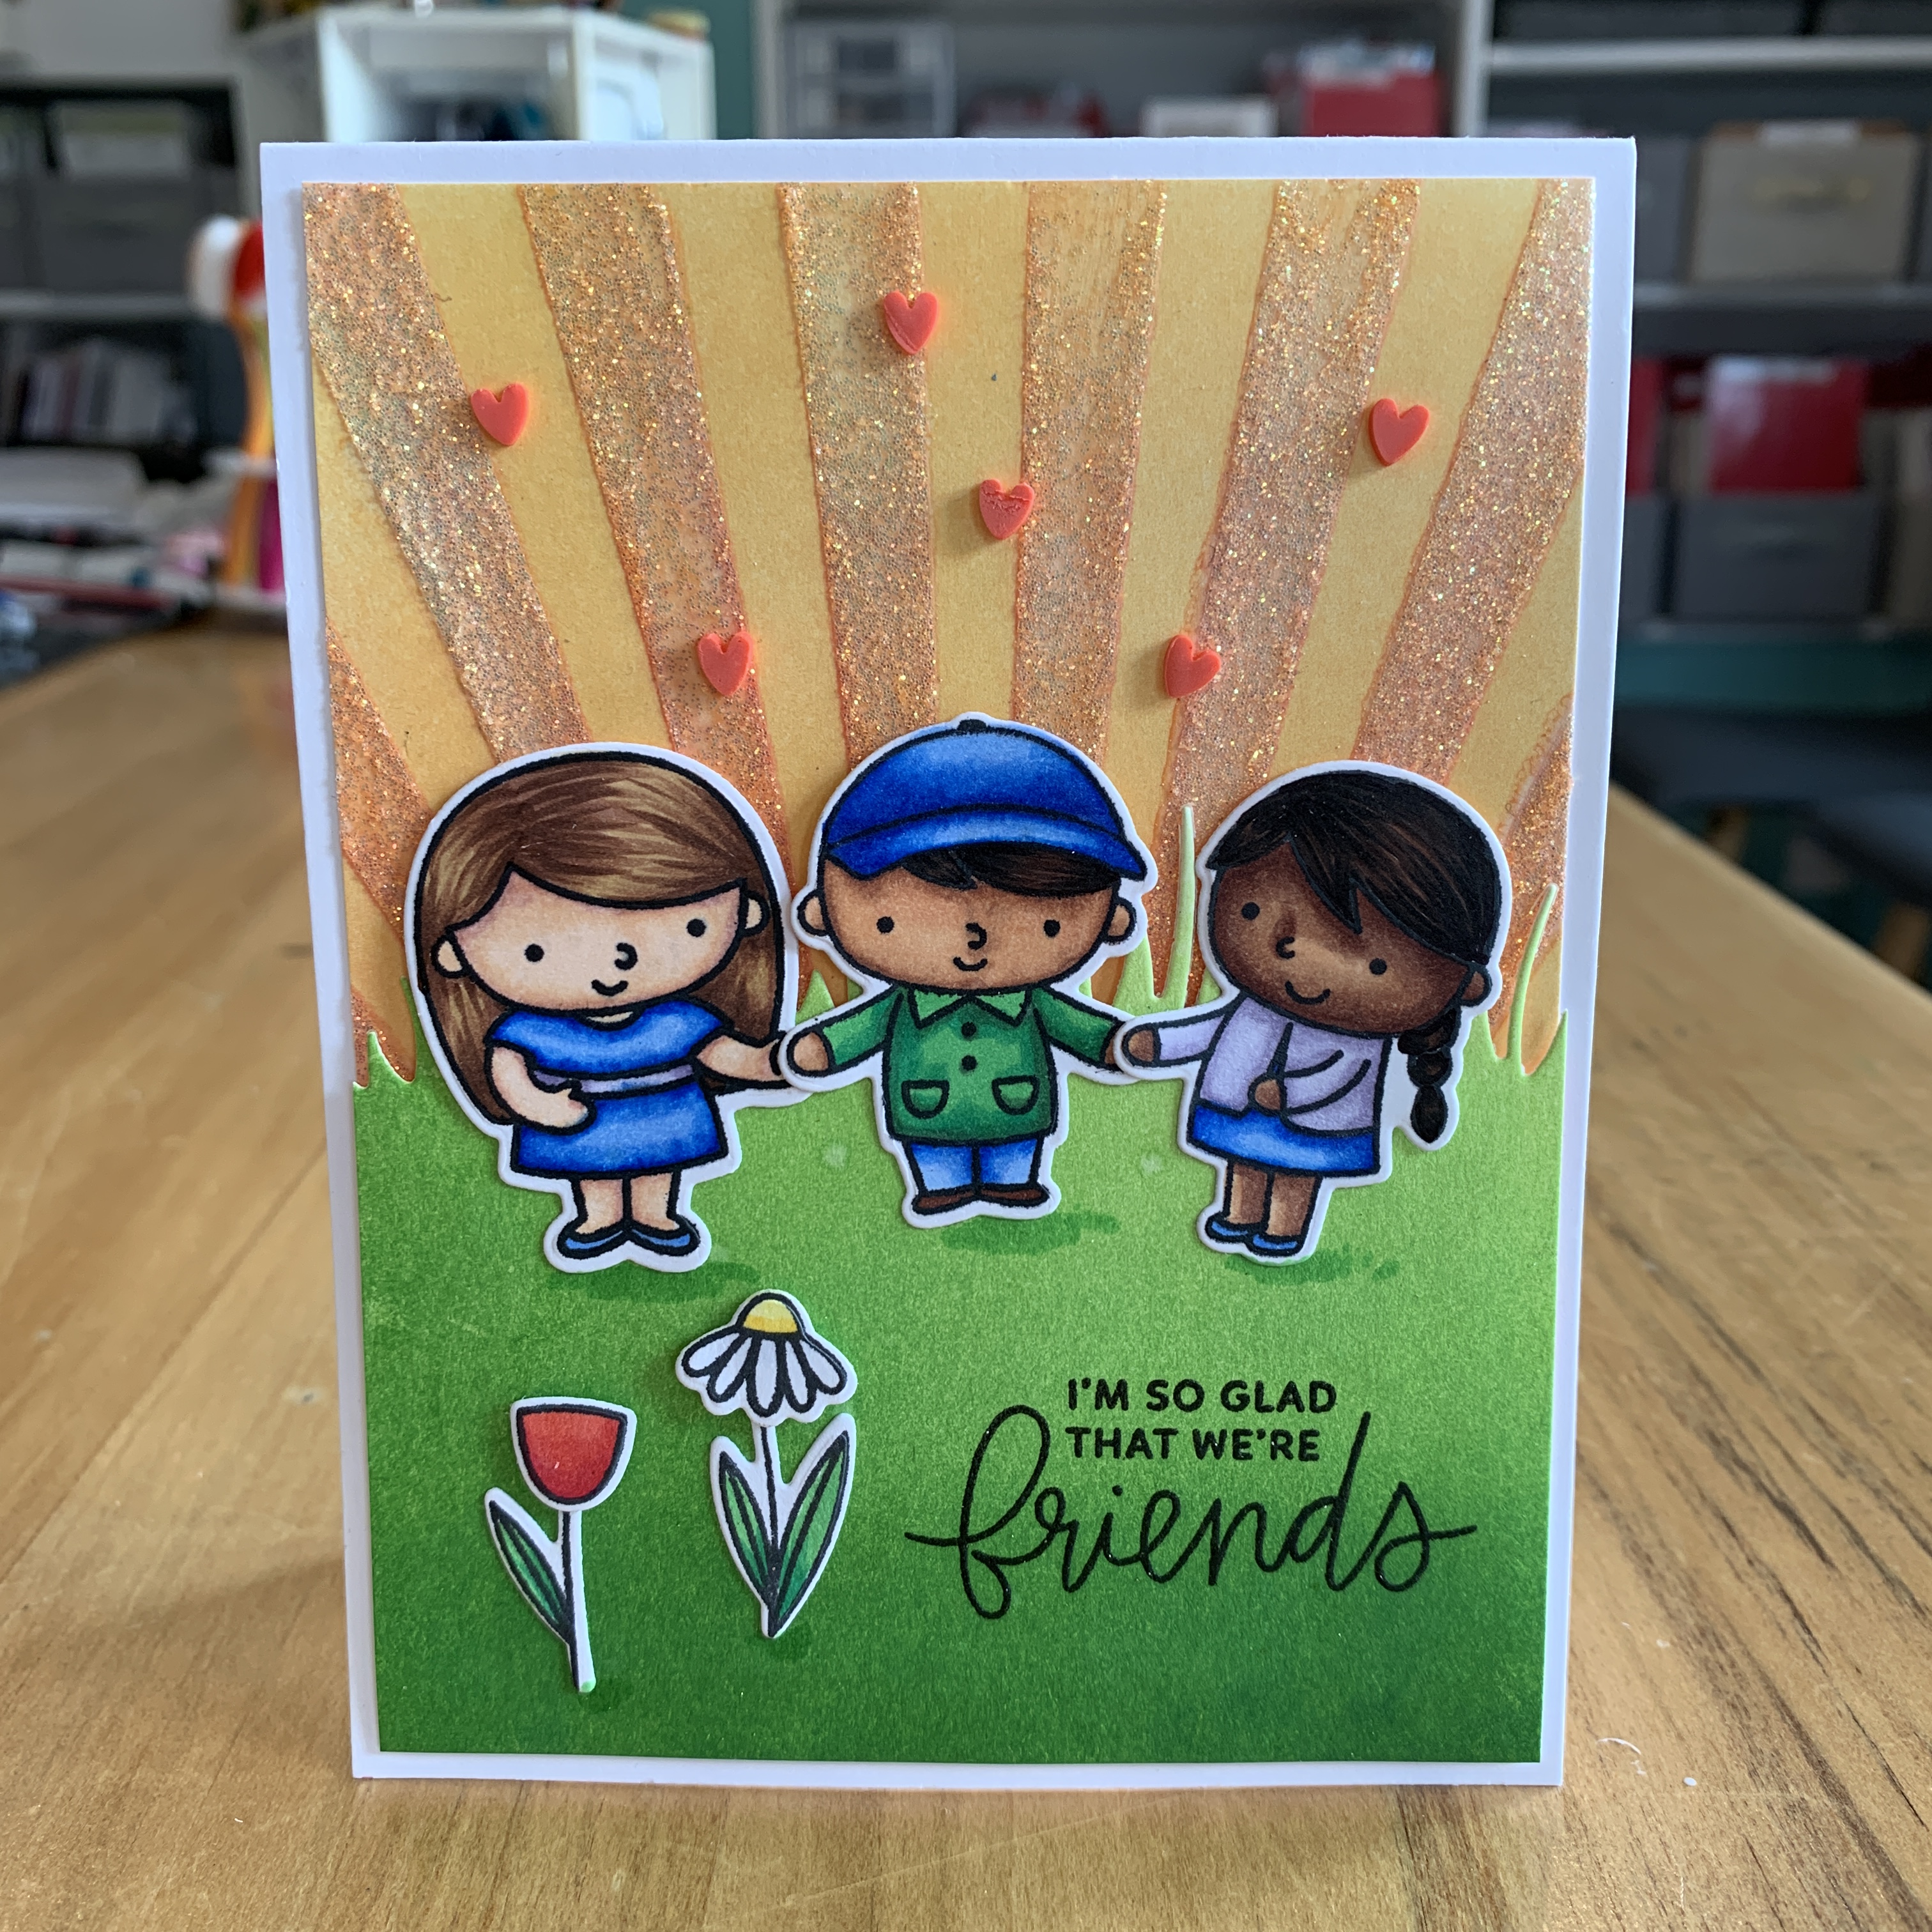
Shimmer was also added to the Friends with the Nuvo Aqua Glimmer pen.
For this card, I stencilled the sky using Distress Inks in Worn Lipstick and then Squeezed Lemonade over the top of that, plus a layer of Gina K Glitz Glitter Gel.
I distress inked the grassy hill with Mowed Lawn and Twisted Citron. I added a bit of foam to the back of this piece, arranged my friends and stamped the sentiment. I added the little flowers which are included in one of the stamp sets, and scattered some clay hearts from Honey Bee Stamps.
This card front is die cut with the largest MFT stitched rectangle and an Avery Elle wonky rectangular frame was die cut a few times, stacked and textured pattered paper popped in for the background.
The same patterned paper was used for the top layer of Kindness. I also added shimmer with a Nuvo Aqua Glimmer pen to the people and the Kindness die cut.
Unfortunately the Kindness stamp and die set has been discontinued by MFT but I was lucky and managed to find it at Frantic Stamper earlier this year. Frantic Stamper is a US retailer and brilliant for sourcing hard to find, discontinued stamp sets as well as all the current goodies. At the time of publishing this blog, this set was still in stock with them and I have provided a direct link below.
Images from MFT Mermazing
I love making cards with mermaids, and this My Favorite Things Mermazing set is definitely one of my most favourite. It is one of the first stamp sets I ever purchased from MFT!
I’ve coloured her up thus far, and will include her on a card in the near future.
This completes my cards and colouring skill practice today. Thank you for stopping by! Below are links to the products I have used – some are affiliate links (not all) which simply means I may get a small commission at no extra cost to you when shopping. Thank you for your support – it means I can keep creating and sharing with you.
20 to be exact! My daughter Stella is leaving her teenage years behind….
She has always been a fan of pandas, so a bit of artistic fun was had altering Bill the Bear from Honey Bee Stamps. I will show you below how I altered the stamp and coloured him up.
Before we start, I will point out that the background pieces I have used are from a previous alcohol ink lifting session – here is a link to Jennifer McGuire‘s blog (and video with lots of examples) showing this fun and incredibly easy technique.
I used the Lifted Ink panel on the bottom for the Panda card, and the top panel is on a bonus card featured at the end of this blog post.
I clear heat embossed the Simon Says Stamp Leaves & Berries stamp on my alcohol inked panel, spritzed with isopropyl alcohol (available from pharmacies). I then laid a piece of white cardstock on top and ran them through my die cutting machine (no dies were involved in this) – the ink transferred from the Yupo paper (top) to the cardstock (bottom).
This left me with two gorgeous inky backgrounds to turn into cards.
Of course, you can ink up any background panel you like, with any colours. Or even use patterned paper if preferred. The beauty of a black and white bear, is he matches any colour choice!
I stamped Bill the Bear on his own and marked out with pencil where I wanted to add the black markings to turn him into a cute panda bear.
Using my Copic markers, I used gentle flicks to add colour both from the bottom and from the top of the midsection. I started with C9, then added flicks of C7 and C5 to meet in the middle. This gives a bit of texture to his fur.
I then went back and started with 100 (Copic Black) and did a second layer of flicks, then C9, C7 and C5 again to add extra depth. The same was done on his legs and arms. I coloured his ears and eye patches with black and C9 markers.
Later in the project, I felt the line on the midsection of his tum was a little harsh, so I added further flicks of C9, C7 and C5 going downwards to soften it up a little.
I played with placement for my panda, and decided a frame with a nice large sentiment would work for this card.
I chose the frame (die cut and stacked three times) from Mama Elephant Snail Mail, and the gorgeous Oh So Many Birthday Wishes stamp from Picket Fence Studios.
Look at that smooth gold!
I heat embossed the sentiment not once, not twice, but THREE times (use your stamp platform or Misti for this). It is a complete sentiment stamp at a brilliant size to be a focal point on any project.
Embossing three layers of powder helps the sentiment stand out a little more from the colourful background. I love taking any opportunity to emboss multiple layers for impact and get that raised, but smooth look.
At this stage, I felt the panda needed a couple of accessories to make him look like he was actually enjoying the festivities. Bill the Bear stamp set does include a number of fun accessory stamps and they are aimed at the outdoorsy type with images such as log fires, honey collecting, fishing and even toasting sausages and marshmallows. There are even a couple of cute vest options and a bow tie to dress him up! As cute as those are, they didn’t fit the theme of my card today, so I did have to look through my stash for appropriate sized party type accessories.
The balloon string is tucked into the slit of his paw.
I added a balloon and a gift from the Ellen Hutson Bear Ware stamp set, and coloured them in bright red. I used R59, R29, R27 and R24. The bear die cuts little slits on the bottom of the paws, so it was easy to attach some crochet thread under his paw for him to hold his party balloon.
The gift is slotted in under his other paw. They are a perfect size to match Bill the Bear.
Final details are added, Nuvo Midas Touch gold glitter pen to the balloon and gift, glaze pens on the eyes and nose – I love the extra shine and sparkle this adds.
Double sided tape comes in a variety of widths from 0.25″ up to 6″ wide!
I use Art Glitter Glue for just about every thing when I craft, but I do like to use wide double sided tape when attaching my card fronts to foam and card bases. Sometimes inky panels have a bit of a kink in them, making them difficult to smooth out with just glue.
I put my tape as close to the edge and corners as I can, and this ensures an even adhesion with no bubbles along the edges of the panel.
Bonus Card
With the other inky panel, I decided to create this quick and easy card. I simply trimmed the panel down and adhered it to a card base with foam in between.
I cut the Mama Elephant ‘happy’ nine times – stacked three each and arranged them on the front with a tiny birthday sentiment heat embossed in white and added a few gems for sparkle.
This completes my festive party cards today. Thank you for stopping by! Below are links to the products I have used – some are affiliate links (not all) which simply means I may get a small commission at no extra cost to you when shopping. Thank you for your support – it means I can keep creating and sharing with you.


 https://linkdeli.com/widget.js?id=f5e8378456858c916708