My littlest daughter is turning 6! She loves unicorns so much, it is mentioned in her school report (my favourite line btw). She is having a little birthday party after school with some of her school friends and she handed out these cute, albeit a little last minute, invitations.
Doodlebug have a great range of papers, brads, stickers and stamps.
The Unicorn Potbelly die set. There are other die sets available – one that creates Santa, another that creates a reindeer, and another that creates a penguin. Shapes are interchangeable, and other animals and people can be created. You’re only limited by your imagination!
The Unicorn Potbelly die set comes with lots of little dies to decorate and build a unicorn – or even other creatures, I’ve seen a walrus on Pinterest! Must give that a go someday.
We built the invitations with Stampin’ Up! pink cardstock, and used Doodlebug papers for the decorative elements. Doodlebug papers are double sided, so there are fun patterns on both the front and back of the wings.
Amélie having fun with her friends and her big brother Xavier at Awesome Bounce, Porirua
After all the partying and eating was done, we wanted to thank her guests for coming to celebrate with her, and gift them with the unicorn potbellies filled with treats – in this case, Dessert Skittles – yum!
They were built the same way as the invitations, but with two bodies to create a front and back. The front has the circle cut out to fit the plastic pouch, and I used the circular tear away tab from The Greetery on the back to make it easier for the children to open up the treats without completely dismantling the unicorn.
Amélie adding glittery details to her unicorns
We added fun details – gold glitter stickles filling in the eyes, the gold glittery horn and heart, plus some little pink flower gems from my stash in the unicorn’s hair.
If you have any questions regarding the putting together of this project, please feel free to message me – I’m only too happy to help!
My friends and I are typical crafters – our heads are easily turned with all the pretty, glittery, innovative things on offer and we often find that we shop faster than we create! There are certainly a lot of laughs and ‘ooh what did you get’, and showing off happy mail messages in our group chat!
Shipping goodies to New Zealand does take a little while, and often by the time we receive our parcels, a new bunch of things have been released, another Youtube video has gotten our creative minds excited and we ‘forget’ to make time to create that other thing we had in mind. So, we have decided to set ourselves a “use your stash challenge” and try and create three cards a month – using things we have purchased and not used before.
Wine. For sure.
I am so relieved to find I am not the only one with unused, still un-cut dies hidden away in my stash boxes!
Here are my offerings for the #craftystashchallenge for February 2020. I made a list of stamp/die sets I wanted to bust out so when I sat at my craft table during the month, I could refer it and just get started with one of the sets listed. So many fun ideas on Pinterest, I remember now why I wanted them in my stash so much in the first place!
You Crushed It
There are so many beautifully inked cards on Pinterest using the MFT Soda Bottles die set – they really convey a sense of summer, I can almost taste the fizz!
I used my Taylored Expressions Blending Brushes to blend Distress inks (Festive Berries, Carved Pumpkin and Squeezed Lemonade) on my card front, starting dark at the bottom and fading away towards the top. Blending brushes definitely made this a lot easier, especially as I was blending three different colours at the same time. I sprayed a mist of water and also Tsukineko Shimmer spray for some subtle texture and glitter.
I added ink to each of the bottle die cuts, inking dark to fade just like the background, and put a little colour on the straws too.
Distress Ink doesn’t stamp crisply, that’s not what they are designed to do, so I used Catherine Pooler inks (Rockin Red, Orange Twist and Limoncello) to stamp the fruit onto the die cut labels for each bottle.
I white heat embossed the sentiment on a wide black strip and adhered it to the bottom portion of the card with foam tape. The bottles sit nicely on top of it, also using foam tape to stick them on in a row. I added a little Nuvo Crystal Glaze to the labels for shine.
Manly Gift Tag
The MFT tool charms is something I’ve had for AAAAAAAges in my stash – one of those things I keep meaning to use, but there were always other things on my craft table taking priority. So, I chose to have these on my list for our first #craftystashchallenge.
My husband works in a government department by day, but is a very handy DIY guy when he’s not at work. He is often given gift cards to his favourite stores – Bunnings and Mitre 10 to go replenish his building supplies, and I thought a gift card holder was a fun idea for the teeny and oh so cute tool charms.
I cut the little tools from some silver mirror cardstock, and then again in red to trim where necessary, and add the red handles onto the silver tools.
I experimented with a couple of tag layouts, and settled on the Mama Elephant gift tag, cut from Bazzill Brushed Metal cardstock, which conveniently cuts little corners to perfectly hold a gift card. I used the Technique Tuesday Tools stamp set for the sentiment, added a strip to write the recipient and gifters names and decorated the tag with the tools.
Merry Kiss-Mas!
This is another of those things I purchased with the full intention to include a gift tag in last year’s collection. It just didn’t happen! Somehow, when October rolls around, so does a lot of other frenzied activity – none of which involves relaxing crafting time!
So I decided to get this little die set out and the pouches, and have a play. It helps that I have a friend who makes beautiful lip balms and other goodies from things like beeswax and kawakawa, all natural ingredients. I feel a collaboration coming on!
I cut two tags the same size and the pouch is secured between the two layers.
I fashioned a tag – turns out in my vast collection of tag dies, I do not have a tall skinny type suitable to fit a lip balm pouch! Stampin’ Up! punches to the rescue (and a quick bit of side browsing online haha).
I played with my Taylored Expressions blending brushes to get a bit of an ombre effect with my inking. I had it quite pretty at one point, but made a mistake in not leaving it alone 🙁 Do you do that too? Spraying it with a bit of shimmer helped! Shimmer always helps hahaha.
I did find a new lip balm in the house, and I peeled off the original label and created my own with the Hero Arts Candy Stripe stamp. I used 160gsm paper, but think I will go and find something a little lighter in future to get a nice curve around the barrel of the lip balm.
I used the My Favorite Things rip strip on the back, and put the tag together with the lip balm secured inside the pouch. The die set includes a die for the frame which I cut from gold glitter cardstock.
I die cut a My Favorite Things Teeny Tag and stamped Merry Kiss-Mas in red ink. This is tied to the top with gold ribbon and some thin gold cord to complete the little gift tag.
That completes my first #craftystashchallenge. I am hoping my friends will continue to do this with me and do it all again next month!
If you have any questions regarding the putting together of these projects, please feel free to message me – I’m only too happy to help!
My first class for the year was held at Scrapbook Central, Petone, Wellington.
Today’s class focused on creating a shaker card, and using the leftover die cut pieces to do some inlay, thus creating a second card. We also looked at some basic copic colouring and introduced the class participants to two colour blends – pink and orange.
Butterfly secured inside the shaker in such a way that it remains upright, but can still move about quite freely.
Die cut inlay and butterfly built and coloured in layers.
A shaker is an interactive card, which has depth and a window to see tiny elements such as confetti, sequins, beads etc freely moving about in a contained space. They move when shaken. We stepped up the basic shaker to include a die cut butterfly inside that is secured in such a way that it will never flip, fall to the bottom, always remaining the right way up but still moving freely in the shaker.
Die cut inlay is a technique where a die is cut twice and the inner pieces transferred to the second die cut outer frame – usually with contrasting colour ways – creating a smooth surface with great interest.
Supplies List:
Both cards were constructed onto a Bazzill Marshmallow 4.25 x 5.5 inch card base. All supplies listed are available from Scrapbook Central – you can order online, or visit instore.
Memory Box Side Butterfly Frame
Memory Box Jotted Birthday Script
Lawn Fawn Happy Happy Happy Stamp & Die set
Echo Park Mini Blossoms Background Stamp
Kaisercraft Blooms Embossing Folder
Circle dies – 3″ and 3.25″. I used the Hero Arts Nesting Circle Dies set.
Class attendees were given a kit with pre-cut elements. And chocolate. (Who crafts without chocolate??!). They inked, heat embossed, die cut and built two cards over the course of the workshop.
Our class getting underway – we had a full class of 12 participants!
We looked at easy ways to keep die cut pieces together for simple inlay, using adhesive on tricky intricate dies, some fun products to create shakers with, and built beautiful butterfly embellishments full of colour and dimension.
Progress pictures – there were some beginner crafters having their first try at inking with Distress Oxides, and confident crafters learning new (or perhaps re-remembering!) techniques.
We also had an introductory lesson in Copic colouring and blending. For further resources on colouring (including copics, watercolouring and other mediums), you can find a list here of my favourite online classes, where to find downloadable charts etc. Also, my Colour Page has information about Copic markers and other ways to add colour to your projects.
Thank you to everyone who attended today, and to Philippa & Jonathan for hosting me! It was a great day, full of creativity and laughs.
As promised, there is a second blog post with the extra card examples using the same products featured in today’s class – click here.
For more in-depth information about the best value supplies for your craft table, from cardstock, inks, adhesives, to the handiest tools, check out my Best of the Basics series.
I’d appreciate it if you hit Follow below, and/or follow my Facebook page so you’ll be kept up to date with upcoming classes. I regularly share other cards, along with tips, hints and ideas.
When I use a stamp or a die, I really like to be able to use it in different ways – so here are further ways to use the die featured in today’s Shakers and Inlay Technique Class as promised, plus a sneak peek at products featured in my next class scheduled for May 2020.
Supplies:
Memory Box Side Butterfly Frame
Memory Box Jotted Birthday Script
Lawn Fawn Happy Happy Happy Stamp & Die set
Circle dies – 3.25″ and 3.5″. I used the Hero Arts Nesting Circle Dies set.
Acetate & Vellum
Nuvo Sequins and Confetti
Hello
‘hello’ from My Favorite Things1/4 inch score line at the top of the circle for the back of the card. Adhered to the front with thin double sided tape.
I cut two circles, just slightly larger than the Memory Box frame. You could choose larger circles if preferred.
I scored a .25″ flap at the top of one of the circles and used strong double sided adhesive tape to secure it to the back of the second circle. This creates the card base. See photo 2 for close up.
I cut the Memory Box frame three times from white cardstock and stacked them together. I did the same for the ‘hello’.
For the background, I looked through my box of previously created backgrounds, and chose this green alcohol inked example. I cut a circle to fit the back of the frame. A die cut inlay would work well on this card too. A white heat embossed sentiment on a black strip plus a few little gold gems in the flower centres completes this cute little card.
Butterfly Shaker
You can see the different coloured confetti in each of the butterfly openings.
I used the intricate butterfly die to cut three butterfly shaped openings on a landscape piece of cardstock. I used a stitched rectangle to give it a tidy edge, and cut a piece of rainbow striped patterned paper just a little larger to give a slim frame around the outer edge.
I decided where the birthday die cut was going to sit and stamped the extra sentiments on either side. This is the time to heat emboss if you want a finished look to the stamping, before the acetate is added.
The shaker part was created by adding acetate to the back of the butterfly panel and strips of foam adhesive in circles around each butterfly opening. You could simply have strips of foam creating one large rectangle, but I wanted certain colours of sequin/confetti in my openings like a rainbow. Further foam strips are added around the edge of the white panel. I am generous with adding foam, as I want my card to feel solid and stable.
The rainbow panel is added to the back, like a lid. To make this part a little easier, I lined up the white panel with the confetti sitting in their circles up with the grid on my glass mat, so I knew which grid lines to match the rainbow piece to get an even frame.
The card front is added to a card base, and a few silver gems added for sparkle. I did add black glitter cardstock bodies to the butterflies to give them definition.
Rainbow Vellum Shaker
Distress inks used: Candied Apple, Carved Pumpkin, Squeezed Lemonade, Mowed Lawn, Salty Ocean and Wilted Violet.A rainbow butterfly – you can use any colouring medium for this.
I had a rainbow distress inked panel which I wanted to use, so I cut it down using a scalloped rectangle die from a Tonic background die set (incidentally, this die set will feature in my next technique class coming up in May). The rectangle panel is adhered directly to the card base.
I cut the circle frame out a number of times and stacked them instead of using foam. I also used vellum instead of acetate, for a different look.
I coloured the butterfly with a rainbow of colours to match, and the top intricate layer is cut from gold mirror cardstock.
I stacked the ‘happy’ to match the height of the frame and added the sentiments and gems.
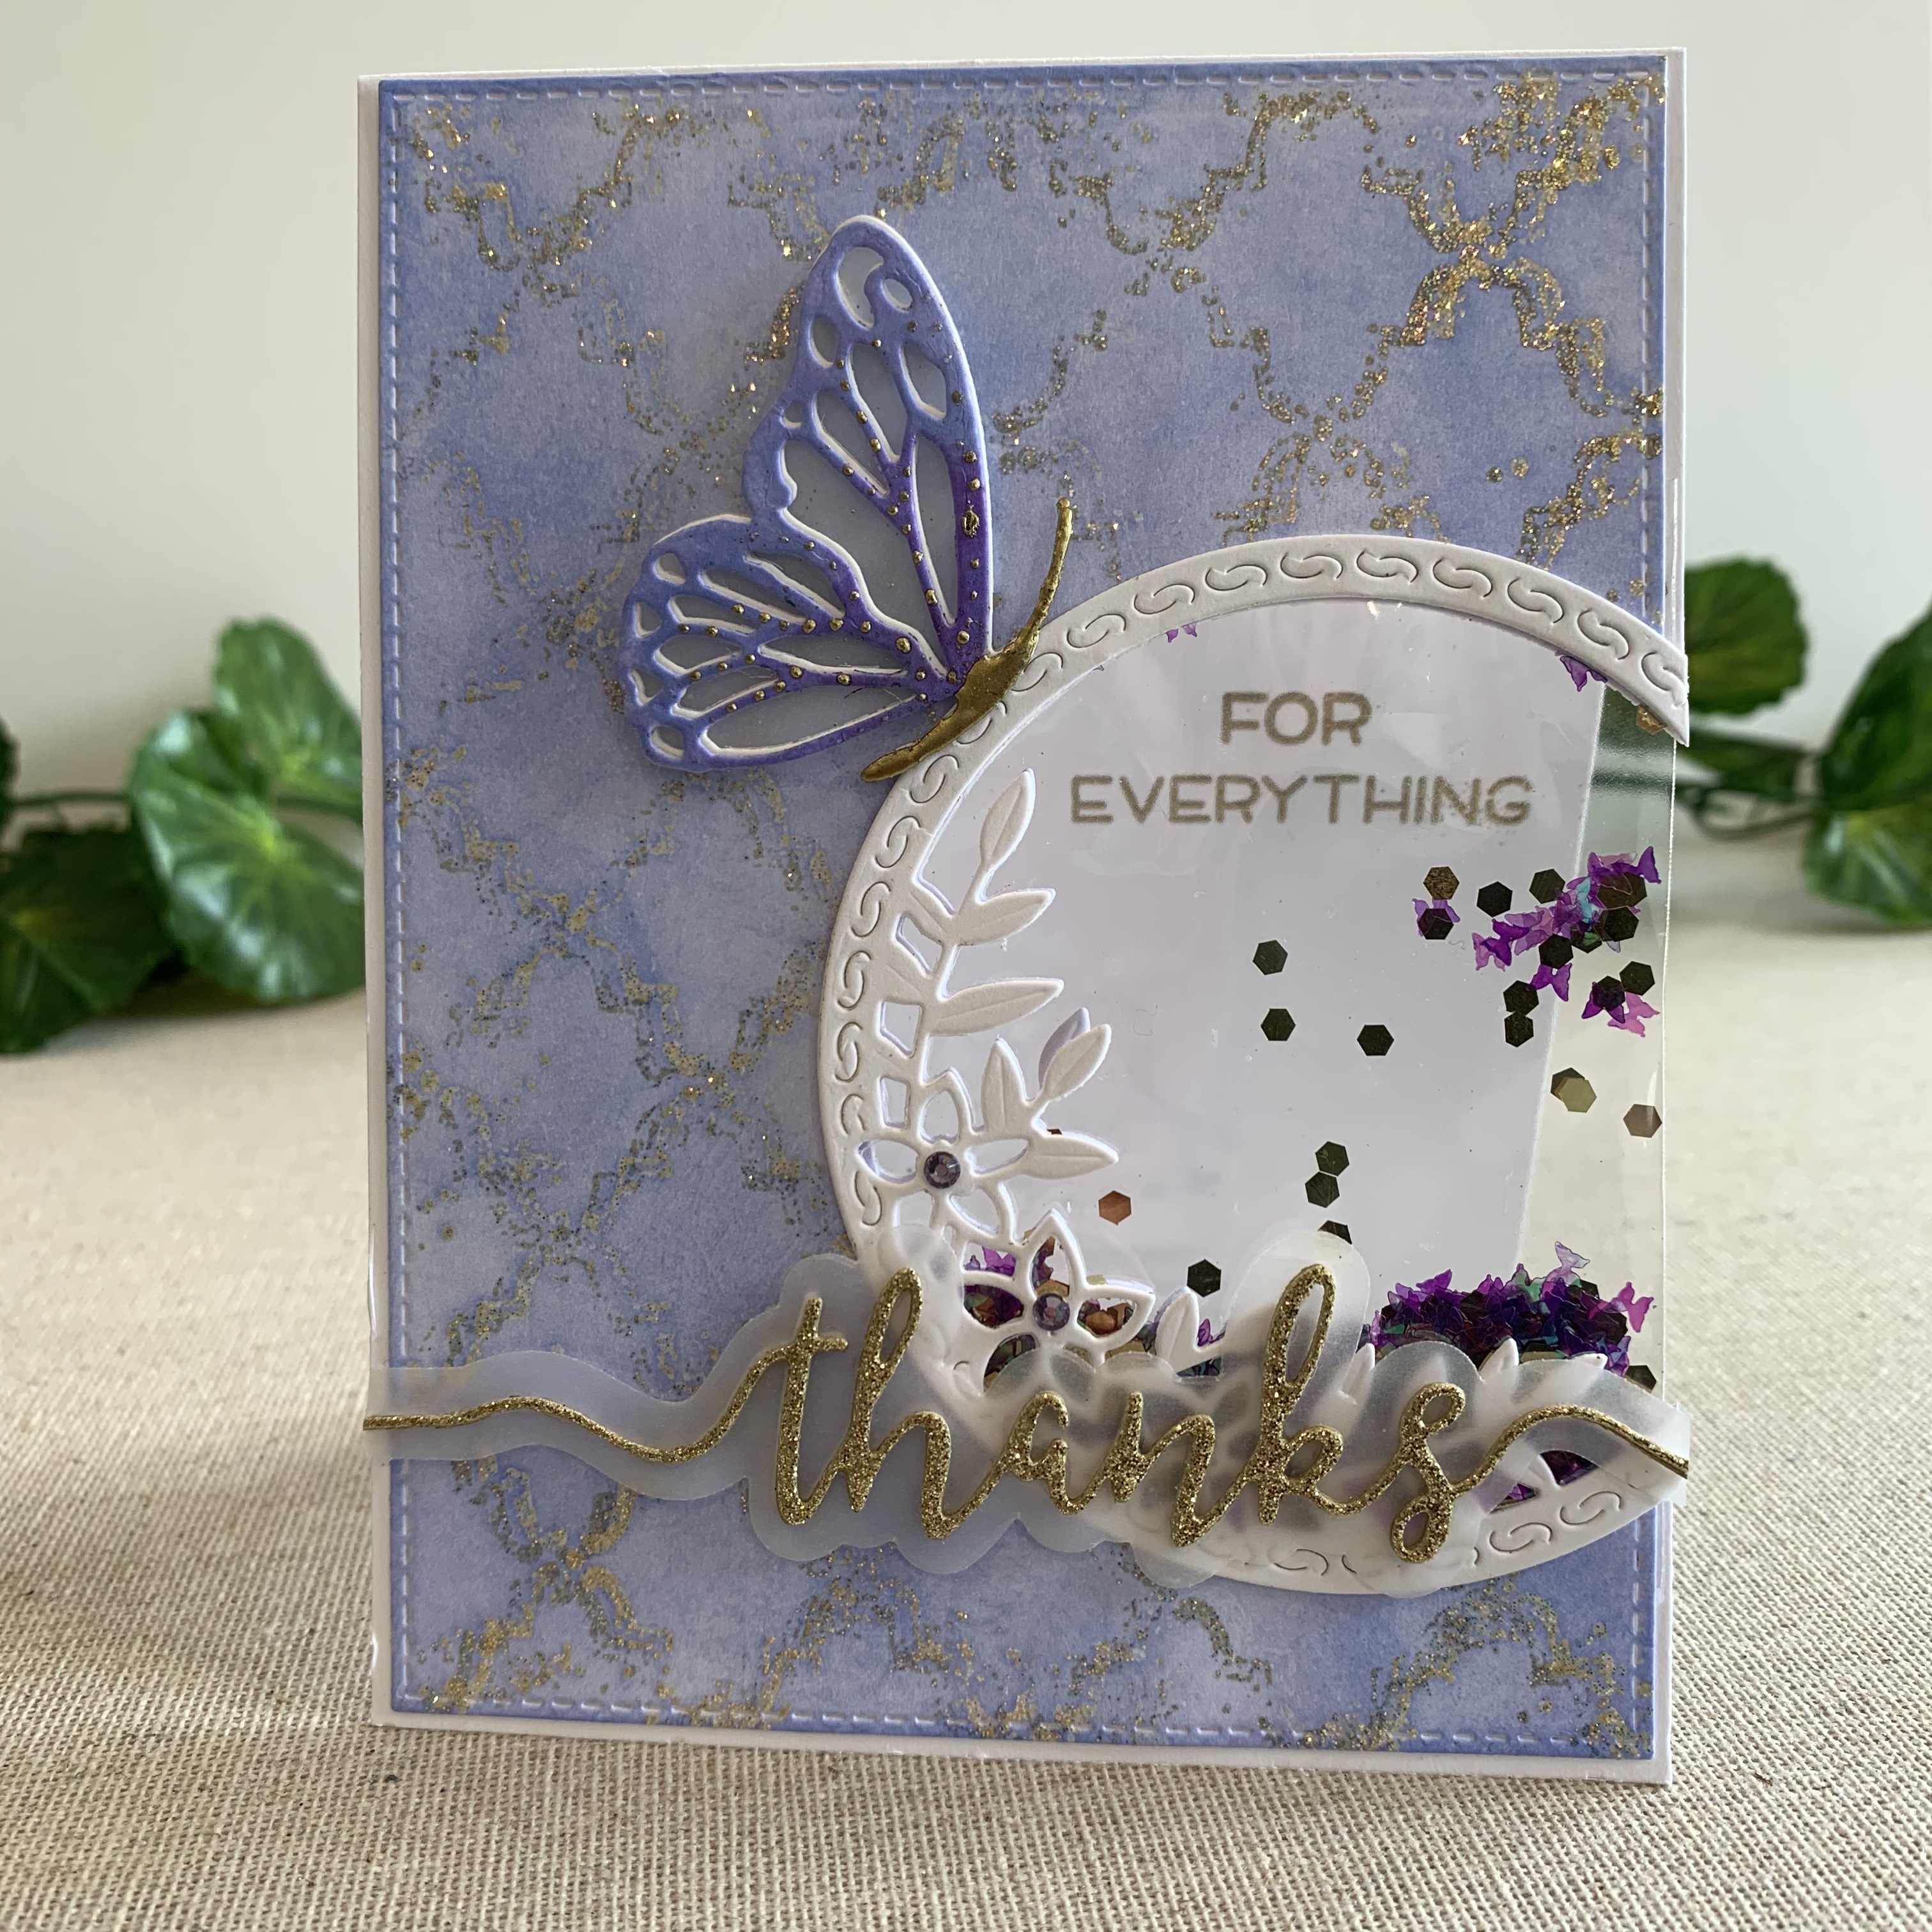
Off the Card Shaker
This type of shaker is not bulky at all, and perfect for sending in the mail.The purple layer is slightly offset with the white to give an illusion of extra colour and dimension to the butterfly. The body is dipped in gold embossing powder and heated to melt. Little extra dots of gold are added to the wings by using dots of glue and heat embossing with gold powder. The inside of the card, back of the see through shaker.
A fun variation of the shaker is to have it off the side of the card. This is easily achieved by using packaging from a stamp or die set, using the corner of the bag where it is already perfectly folded and sealed.
I temporarily taped the card front (inked with Shaded Lilac and gold sparkle heat embossed) to the base and cut the Memory Box frame to create the opening.
I filled the packaging bag with confetti and used thin double sided tape to close the remaining two sides, ensuring the bag is a little larger than the opening. I lined up the edge of the bag with the edge of the card base, hiding the adhesive edges in between the two layers of card base and card front.
I cut two further frames and glued one to the front, and one to the back matching them up. The edges are trimmed off to match the edge of the card base.
You can also see I turned the frame a little to suit, so the flowers and leaves were not sitting at the bottom, rather climbing upwards.
I added a ‘Thanks’ by Tonic Studios across the bottom, and sentiment on the inside of the card. The butterfly is built with a vellum bottom layer, white intricate layer and inked layer adhered slightly offset. I heat embossed the butterfly body in gold.
Thank you for getting this far in my blog post! I had a great time teaching this Technique Workshop, and hope you enjoy the extra examples featured here, and have some new ideas to try out for yourself.
For more in-depth information about the best value supplies for your craft table, from cardstock to the handiest tools, check out my Best of the Basics series.
I’d appreciate it if you hit Follow below, and/or follow my Facebook page so you’ll be kept up to date with upcoming classes. I regularly share other cards, along with tips, hints and ideas.