

After having a very full on class with 12 participants making Gift Tags using products from MFT, Lawn Fawn and Memory Box, I had a few minutes to show a few extra projects using the same dies they had used in the class. There wasn’t time to go into detail on the day, but I thought I’d post them here for anyone to refer to.
Products we used:
- Spellbinders/Sizzix Rubber Embossing Mat
- Nuvo Shimmer Powders
- Watercolour cardstock
- Nuvo Glitter cardstock (gold)
- Memory Box Snowflake Ornament die
- Lawn Fawn Mini Wreath die set
- Lawn Fawn Tiny Tag Sayings
- My Favorite Things Deer Love die set
- My Favorite Things Joy die
- BoBunny Nesting Gift Tags die set
All products used can be purchased at Scrapbook Central
PLEASE NOTE: The Deer Love die set has been retired at My Favorite Things (I’m just as shocked as you are!) – there is another reindeer die set available which can be used in the same way as described here
Any extra products used, I have provided links directly to the company for your information. Please support your local businesses where possible and ask your favourite retailer if they can order them in for you.

Nesting die sets are more than just the shapes themselves. You can use them together to create windows and frames too. The tags we used are obviously a smaller scale than say, a rectangle or circle nesting set which are commonly used in card making for similar results.
In this case a window was cut from the tag using a smaller tag die, and the reindeer placed within. The coloured tag peeks out from behind. For extra dimension, the top frame could have been adhered with some foam tape (something I would do if this was a card).

Intricate dies can be used in so many ways! Here, I have included a vellum layer between the two tags with the ornament cut out. The intricate die cut itself is then placed in the opening on both sides, creating a pretty window.
There are many different fun types of vellum on the market today, plain, pearlescent, platinum, gold, printed, foiled – all of which could be used for a beautiful finish.

In the class itself, we embossed our ornament die. Here, I’ve done exactly the same process, but offset the imprint so it is partly off the tag. Just a different look. This can be quite an effective and eye-catching layout on a card design too!

Again, this is the same technique we used in class – embossing the intricate cut side of the die. But with a Step Up. Before sending the die through the BigShot, I lightly stamped the die onto a Versamark ink pad, carefully placed it on the tag and embossing mat and rolled it through. I then sprinkled gold embossing powder on it, flicked off the excess and heated with my heat gun. The end result is incredibly delicate lines of gold embossing right where it would have cut. So pretty!

Die cut inlay is a fun technique! You get all the beauty of die cut images with no added bulk to the card. I cut the wreath from both the tag and the green watercolored panel (we used the Nuvo Falling Leaves Shimmer Powder). I glued the tag to another on the bottom, and carefully glued the green wreath and white middle piece back in, just like a puzzle. This would look amazing with the ornament die too!
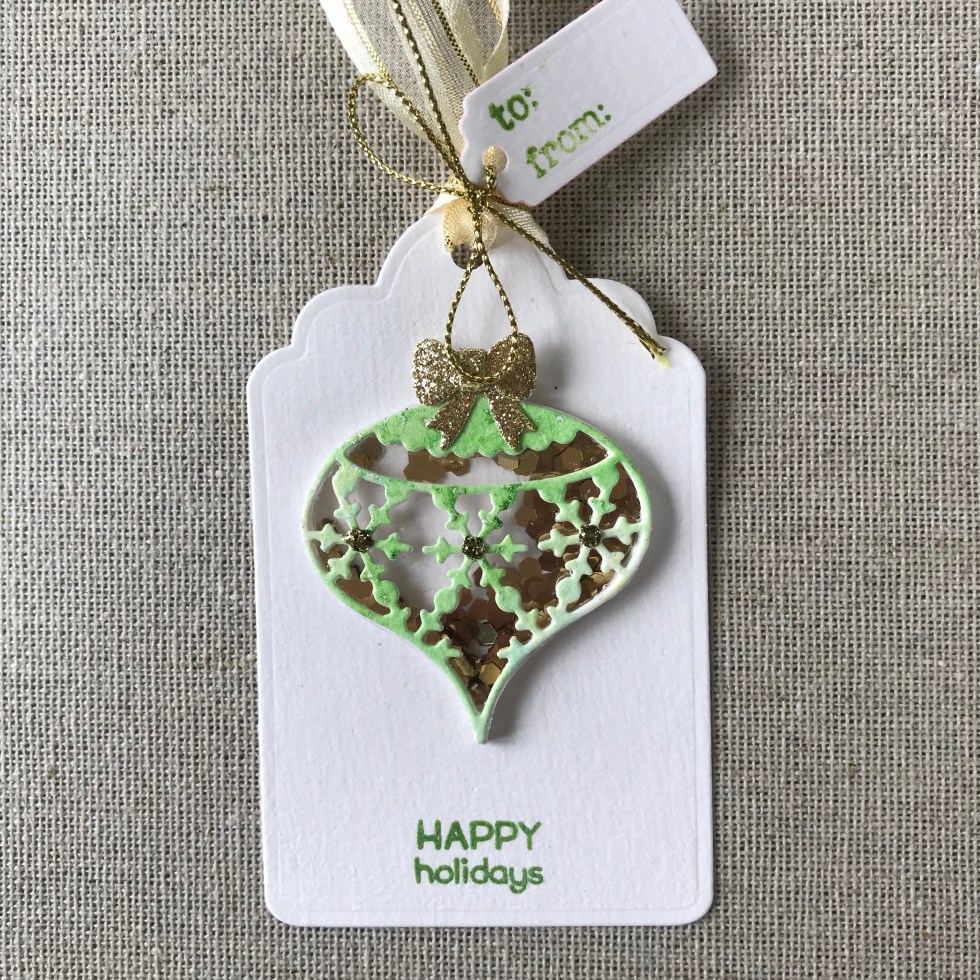
A shaker tag! This tag is extra special. I cut out the ornament once from the green panel, and also from white card stock four times.
The white ornaments had their middle pieces carefully trimmed out, leaving just the frame. These were glued together.
The green ornament had a piece of acetate glued to its back, trimmed down to fit. (Actually Memory Box has a solid die cut of this ornament shape which would make that part a whole lot simpler!).
The stacked white frames are glued in place on the tag, and this is when you can add pretty confetti, sequins or seed beads. I added Nuvo gold confetti shapes to this one. The acetate backed green ornament is glued to the top of the stacked white ornaments.
Bonus Card Ideas
Of course, all of the products used above are not just for gift tags! Possibilities are endless with fun stamps and dies. Here are a few card examples for inspiration.


These reindeer are a firm favourite in my stash. Here, I used Nuvo Shimmer Powder in Blue Blitz to create a textured background panel. I used some rectangle nesting dies I have in my stash to create the wee frame (I will link below to the set I have).
The reindeer are cut 3 times, and their antlers twice and stacked together. This gives them nice smooth dimension and they stand out from the background nicely. The snowdrifts are a stitched curved border die (link below).
I added little gems to their antlers for a bit of sparkle and glitz.


Using your dies for embossing can be used with just about any die you have in your stash – especially backgrounds, frames, intricate borders, nesting sets and even word dies.
Here, I have used the Memory Box Small Circle Burst to emboss the background. The wreath sits perfectly within. I didn’t have a nice large Peace word die, so I made my own using an alphabet set. I cut the letters twice from white cardstock, once from red glitter cardstock and stacked them together.
Here, you can see a close up of the embossing and how it adds a beautiful background and frame for the wreath element.


This final card design is a tri-fold card. It is made with two side opening cards (one opening to the left and the other to the right) and the middle panels adhered together. The front of the card is die cut with the Memory Box Large Circle Burst and I used some invisible thread to dangle the Memory Box Ornament within the circle window.
I die cut the Joy twice from white cardstock and again from Nuvo gold glitter cardstock and placed it on the front with a little black sentiment strip, heat embossed in white.
There you have it. A number of ideas using the same dies used in the Christmas Gift Tag class held at Scrapbook Central in Petone. Please don’t hesitate to ask if there’s anything you’d like broken down further or if my explanation is not clear. Appreciate your visit!