Navy and cream. A pretty different combo for me! They are colours I don’t seem to have in any inks or embossing powder either! So this turned out to be a real challenge.
I tried inking up panels with some distress ink Chipped Sapphire refill ink and Ultra Marine color burst powder (literally the only inky options I could rustle up), but while it looked pretty cool with gold heat embossing, the challenge was to include cream. I didn’t feel cream would ‘go’ with the panels I created. (Look out for these inky panels sometime in a future card or two!).
The background stamps here are both from MFT – Baccarat Background and City Background. I’ll provide a link to them below.
I went back to what I know best, which is die cutting. I cut out a BUNCH of floral foliage from MFT and Altenew with a cream coloured cardstock I was lucky to find a random sheet in my stash! I put the wreath together using the oval frame die in the Altenew Create a Wreath set – you could use a circle frame, or simply pencil in your preferred outline.
I stretched a vellum strip across behind the wreath with a gold heat embossed sentiment from Gina K Designs and glued two further oval frames to the back of that.
PRO TIP: Use tape runner or double sided tape on any vellum pieces – the merest hint of liquid glue sends it all wrinkly! Not a good look!
I used a piece of Hero Arts Nautical cardstock for the card front, but wanted it to have a little interest – I clear heat embossed the Pinkfresh Studio floral diamonds stamp.
To finish, I added some pretty Studio Katia pearls – a very pretty cream colour! – onto the wreath
This completes my card today. Thank you for stopping by! Below are links to the products I have used – some are affiliate links (not all) which simply means I may get a small commission at no extra cost to you when shopping. Thank you for your support – it means I can keep creating and sharing with you.
You can join in the Color Hues Color Challenge too! Click here to visit their blog to find out all the details.
For more in-depth information about the best value supplies for your craft table, from cardstock to the handiest tools, check out my Best of the Basics series.
Oh boy, did I have fun with this card! It’s my first slimline card too!
When I saw the colours listed for the new MFT Color Challenge 157 – Teals and particularly Browns, my first thought was ZEBRAS!
Why would the colour brown inspire a zebra? I used to have a cross stitch pattern of a beautiful, realistic zebra head. Of the eight different thread colours listed, all were shades of brown and ecru. No black and no white listed in the pattern!
Now, I don’t have any slimline sized stamps, dies or stencils, so the slimline challenge of the MFT Sketch Challenge provided an extra set of parameters to find my way around.
I started by creating my card base from Gina K Designs Kraft cardstock and cutting the front panel to fit. My card measures 3.5″ x 8.5″.
I also stamped my zebras with Catherine Pooler Icing on the Cake brown ink. I decided to add extra shading with my Copic Markers – I used E49, E59, E57 and I also used a little W3, W1 and W0 in the white areas for extra depth. R20 and R00 for the noses and ears.
I coloured the little scooter with BG49, BG45 and BG553, W9, W7 and W5. I used a little Nuvo Crystal Glaze on the scooter for extra shine at the end.
I cut three circles, using Hero Arts Infinity Circle dies from Hero Arts Arctic cardstock – I played with these to work out my final placement. I thought it would be fun to have a shaker element in the middle, so I traced the middle circle with a pencil, so I could tell where I wanted to cut through my card front piece.
I used an Echo Park Camping Leaves stencil and Hero Arts Unicorn White pigment ink for the background – this is a 6×6 stencil, and I simply moved it down after the first bit of inking and matched the leaves to continue the pattern, thereby filling the entire card front.
Unfortunately, I can’t find a link for this exact stencil, but you could use just about anything you have in your stash.
I wanted the top and bottom circles to be a little more interesting and I played with stitched hills, stamped flowers and all sorts before I settled on clear heat embossing an Echo Park Mini Flowers small background stamp, then inked the entire circle with Peacock Feathers distress ink – the clear heat embossing resists the ink being laid down, and you can still see the original colour of the Turquoise cardstock beneath. After you’ve inked, rub the piece with a dry cloth, this cleans all the ink off the heat embossing for a tidy and impactful look.
The bottom circle has simply been clear heat embossed, the top has been inked and dry buffed. Such a cool look!
The Shaker Part
For the shaker, I taped two Hero Arts circle dies together and cut three little frames out of Gina K Designs Turquoise Teal cardstock, plus I cut a circle out of some scrap acetate for the window. I glued one frame to the top of the acetate and two to the bottom. Set this aside until the end.
I covered the back of the card front panel with foam tape, ensuring the circle opening was fully encircled with tape to prevent confetti escaping. I placed the top and bottom ink resisted circles and trimmed off the excess. I placed a plain Arctic circle into the shaker compartment.
Now there’s a gap that needs to be filled with pretty Nuvo confetti (Turquoise Stars and Rose Gold Squares), plus I added some Distress Glitter dust. I glued the acetate lid on top, securing the confetti and glitter, and they can move freely about. You could add buttons, beads, sequins, die cut shapes, anything you want.
Finishing
Close up views
I had fun placing my little zebras using foam squares and glue, and adding extra flowers and butterflies. I used Honeybee Stamps alphabet set to make the word Hi. This is cut from the Hero Arts Arctic cardstock and stacked three times. I used Nuvo Glimmer pen to add sparkle to the letters, and I put a layer of crystal glaze on top for shine.
I also used the sparkle pen on the zebras (I forgot that the Catherine Pooler ink is not designed for watercolour so the brown ink smudged a little, but it turns out I liked the effect as it took away the stark white of the zebra). I used my Copic markers to smooth this out too.
I white heat embossed Friend from Concord and 9th’s Say Hello stamp set onto a scrap of chocolate brown cardstock and glued it to the top of the Hi.
I added black glaze pen to the eyes, and white glaze pen to make trails for the butterflies.
This card is being entered into three different challenges:
This completes my card today. Thank you for stopping by! Below are links to the products I have used – some are affiliate links (not all) which simply means I may get a small commission at no extra cost to you when shopping. Thank you for your support – it means I can keep creating and sharing with you.
For more in-depth information about the best value supplies for your craft table, from cardstock to the handiest tools, check out my Best of the Basics series.
Last year I made many many gift tags – and as a result, I have a box full of little projects that never came to fruition. This is one of those. I had stamped and cut the hedgehogs using Copic X-Press It cardstock, and coloured the hats, but that’s as far as I got :/
Inspiration hit finally! I decided to go with a Kraft and rich red colour scheme. I used scraps I had in my craft room from my local stationery store, but Gina K or Lawn Fawn cardstocks would be comparable and I have linked to those at the end of this post.
I chose the MFT Treat Tag because the hedgehog is quite a large image. I wanted to frame him somehow, and decided on the delicate frame in the Concord & 9th Just Because die set.
To get the gold heat embossed background in the right place, I created a mask tag out of scrap cardstock by cutting the frame out where I wanted it placed. I used my little MISTI to stamp and heat emboss the MFT background stamp, Christmas Words.
I used the dot colouring technique for the grey quills.
I completed colouring the hedgehog images – copics used are:
Red: R59, R29, R27, R24
Green: G28, G09, G05, G14
Grey: W9, W7, W5, W3, W0
Skin: E21, E00, E000
To feature him in the frame, I carefully fussy cut out the stocking up to his fist, and trimmed the bottom of the stamped image off. It now sits flush directly on the bottom of the red frame.
Before adhering the framed hedgehog to the tag, I added fluff to the hat with Tsukeniko Radiant Neon Amplify in White – a very effective puffy paint! This stuff puffs up tremendously when heated with the heat gun and STAYS white, giving a lot of dimension.
I glued the frame to the tag, where it fits over the gold heat embossing perfectly
For the finishing ribbon, I added a wide red ribbon found at my local emporium store. It has No Peeking printed on it, and I thought the tone suited the cute image. I used gold ornament cord to secure the wide ribbon, and tied it in a bow.
Finally, the To and From is stamped at the bottom in black, and this stamp is from the Scrapbook.com Gifting and Tag Sentiments – there are three other To & From stamps to use on other gift tags too, plus some other fun sentiments designed for gift tags.
This completes my little gift tag today. Thank you for stopping by! Below are links to the products I have used – some are affiliate links (not all) which simply means I may get a small commission at no extra cost to you when shopping. Thank you for your support – it means I can keep creating and sharing with you.
For more in-depth information about the best value supplies for your craft table, from cardstock to the handiest tools, check out my Best of the Basics series.
You can find more of my Gift Tags from over the years by checking out #inkyandstampytags
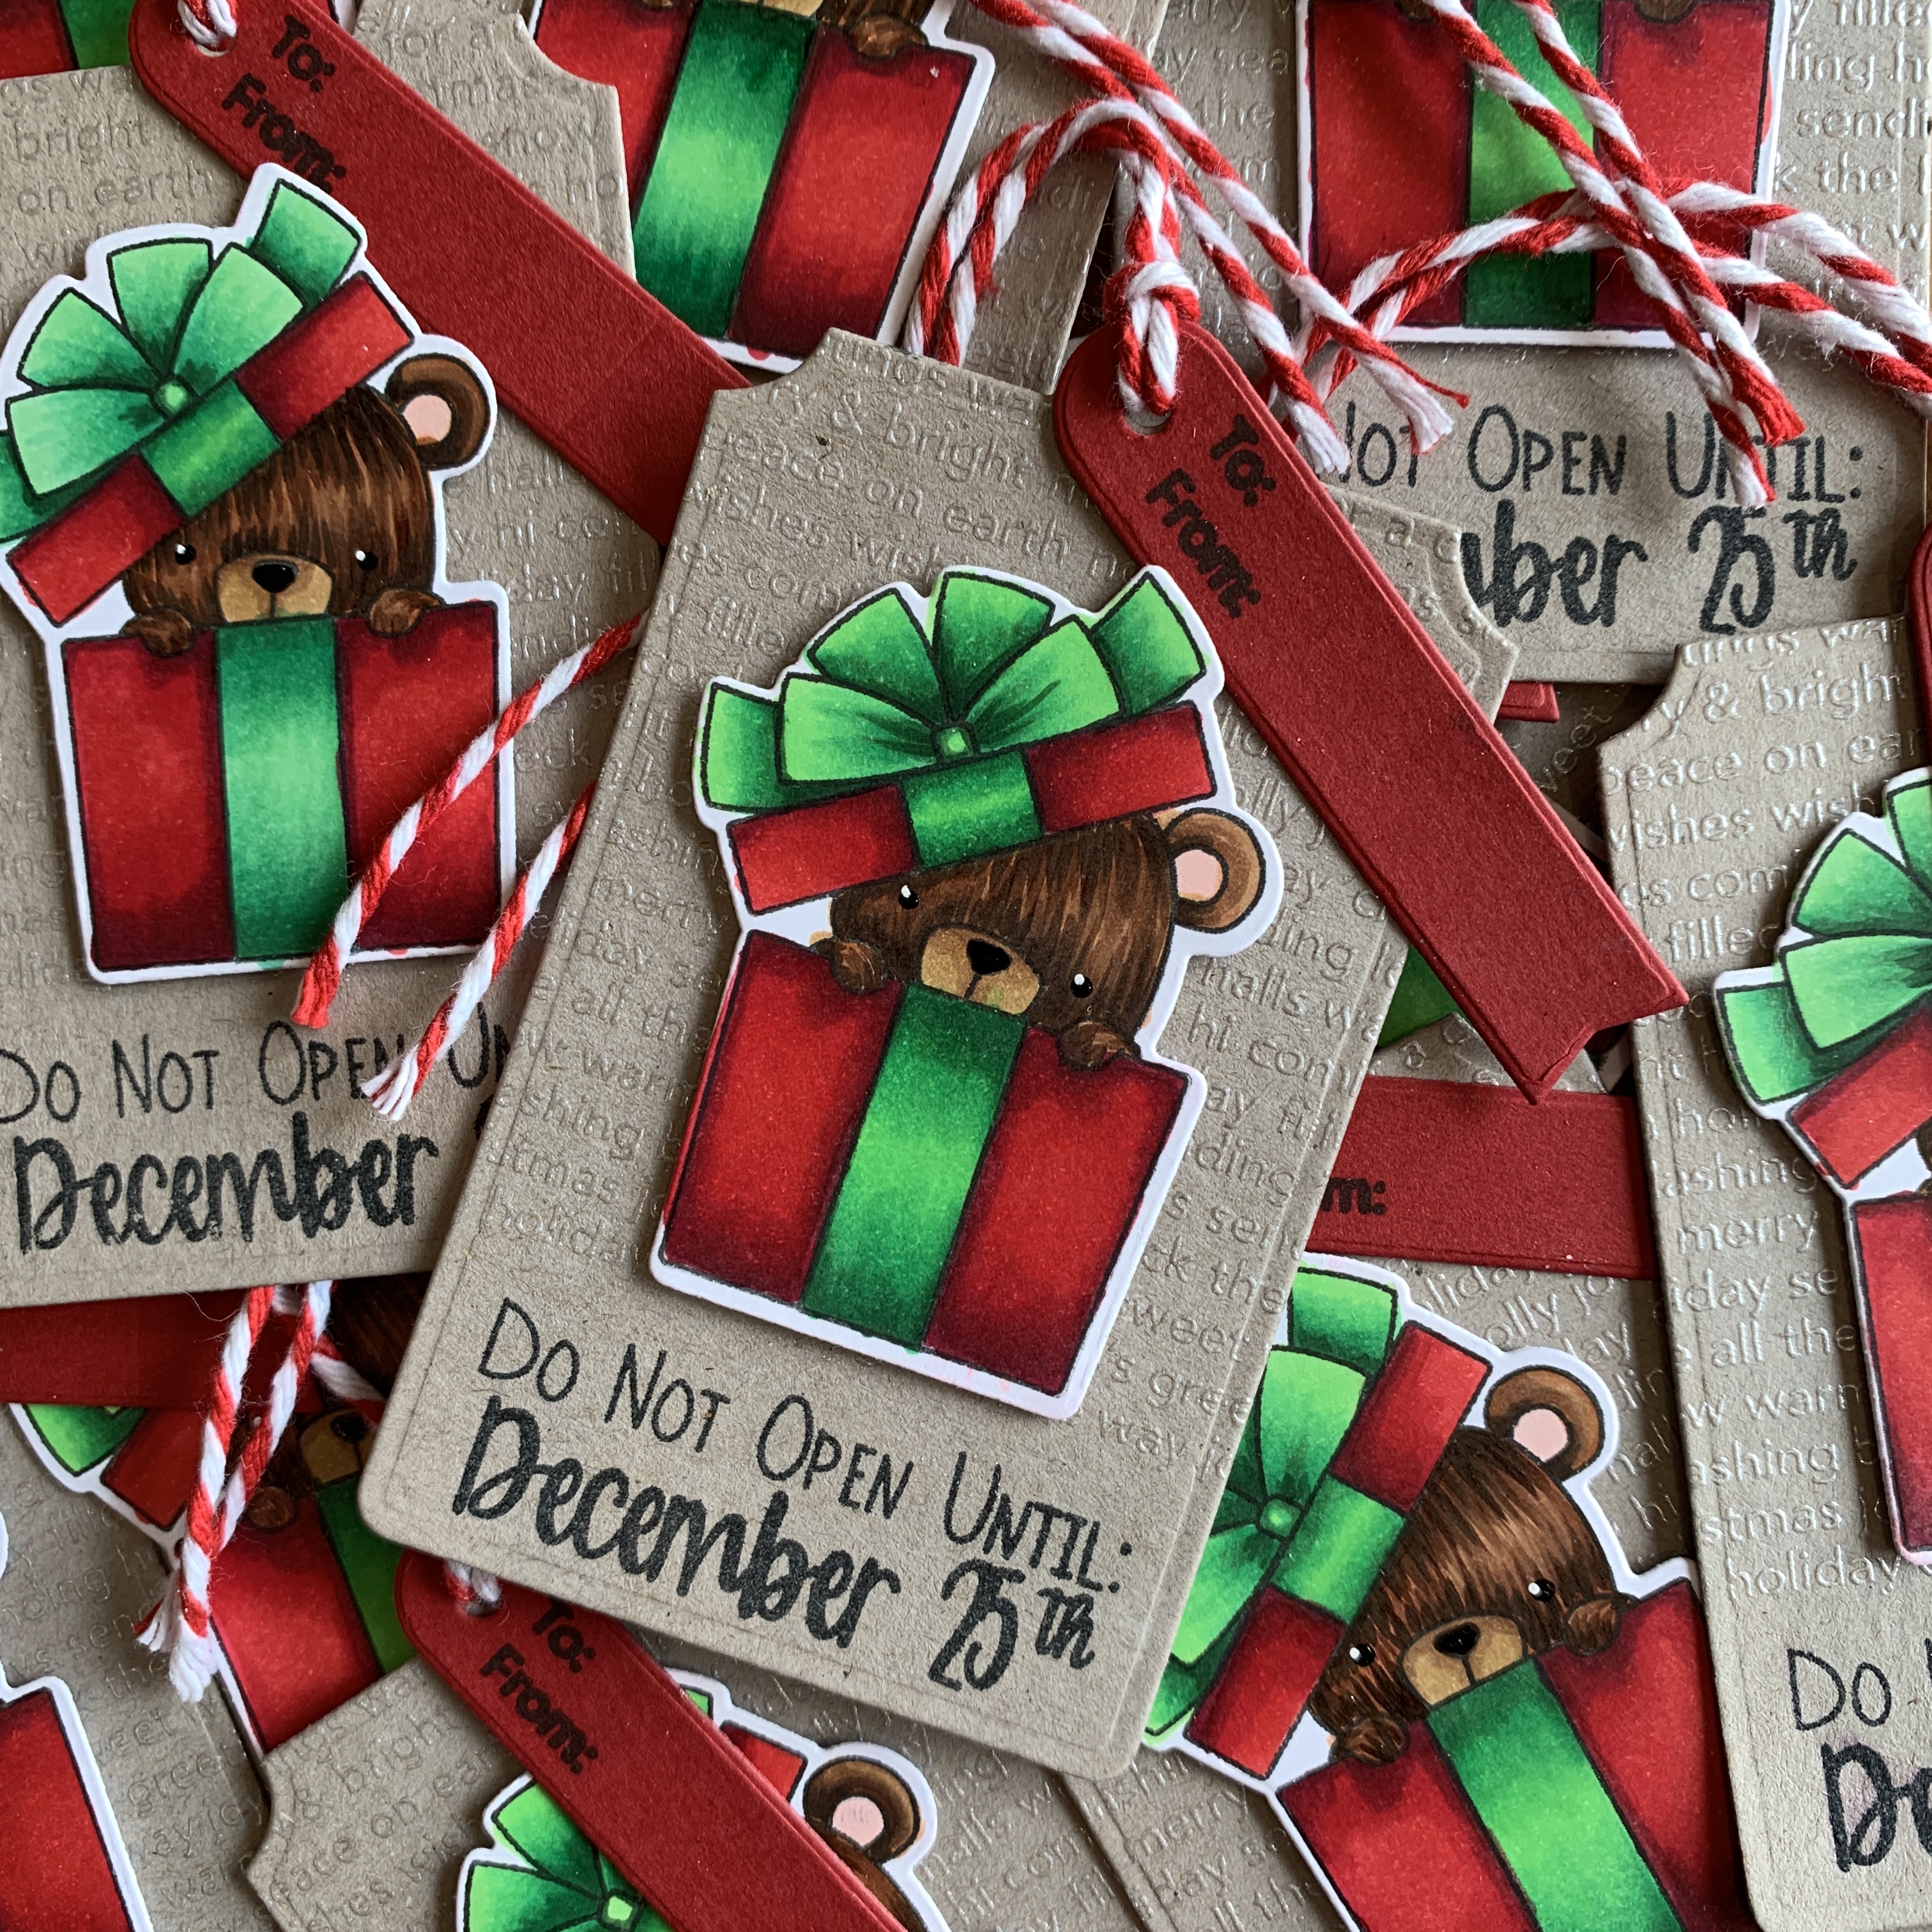
Each year I like to make Christmas Gift Tags as gifts for teachers and other support people important to our family.
I actually stamped and die cut these bears last year, intending to create a tag for my 2019 collection – but creator’s block got in the way! So I sat and stared at them for months. I had coloured just the bears thinking inspiration would come, but every tag idea, colour combo, sentiment match, just didn’t do it for me. So they sat in the box and I told myself this was OK. Didn’t make it any less stressful :/
It’s interesting what a difference a year makes in terms of crafting skill and ideas! I was disappointed with my bear colouring efforts from the year before and had a go at re-colouring them. As a result, I have ended up with darker bears than I’d usually like, so I paired them with deep rich red and emerald green tones for the gift box. The following photos show you which Copic markers I used.
The tag itself was masked off with a strip of post-it tape along the bottom, and I heat embossed the MFT Christmas words background stamp in White Satin Pearl embossing powder.
I stamped the sentiment along the bottom of the tag, and popped the bear on top with foam tape.
I added Glaze details to the eyes and nose of the bear to finish them off.
I added a further mini tag from the MFT Tag Builder 5 with a To & From and tied the two tags together with red and white thick Baker’s twine.
Such a simple tag after a full year of agonising!
This completes my cute gift tag for today. Thank you for stopping by! Below are links to the products I have used – some are affiliate links (not all) which simply means I may get a small commission at no extra cost to you when shopping. Thank you for your support – it means I can keep creating and sharing with you.
This completes my little gift tag today. Thank you for stopping by! Below are links to the products I have used – some are affiliate links (not all) which simply means I may get a small commission at no extra cost to you when shopping. Thank you for your support – it means I can keep creating and sharing with you.
You can find more of my Gift Tags from over the years by checking out #inkyandstampytags
For more in-depth information about the best value supplies for your craft table, from cardstock to the handiest tools, check out my Best of the Basics series.