Posted on 14 Comments

A New Favourite Thing!

Welcome! Today I am excited about a product in my stash which I want to share my success in using it with you – including the resulting cards. Plus, right at the end is my giveaway for you to enter – GIVEAWAY CLOSED – Winner: Grace W, NZ

We all have those dies in our collection – we saw something pretty and bought the intricate die thinking of all the amazing cards to be made. Only to discover yes they’re pretty, but also pretty labour intensive to get a complete and nice cut! I like to stack my die cuts too, making some of the card making processes verrrrry frustrating! I have constant battles with those little ‘ripped out’ corners or having to carefully run through again and again, and simply untidy edges after all the effort. Maybe it’s my cardstock? Do my plates need replacing?? Perhaps I need a whole new machine??? Or maybe it’s just me………?

I have to admit, I purchased the electronic BigShot Express earlier this year and I’m definitely loving it – it has handled intricate dies quite nicely, but now I have found something to really make intricate die cutting a BREEZE.

The Sizzix Chrome Precision Base Plate

It’s like a bright shiny mirror straight out of the package and I was hesitant to scratch up that pretty surface. However, I needed a pretty die cut for a card idea and I knew from past experience that there were a couple of tricky spots so I thought I’d try it out on the Chrome Plate. Well. One pass and all the little pieces just FELL OUT when I ran my fingers over them – didn’t even need my pokey tool. WOW.

So this morning, I got out the worst culprits when it came to die cutting – very intricate background dies from Avery Elle (waves), Crafter’s Companion (clamshell) and Simon Says Stamp (Heart Mandala). DISCLAIMER: There is nothing wrong with these dies, they just needed an extra shim, or a few extra passes through my machine to get allllll the pieces out.

I ran them through on the chrome plate – out of habit I did two passes on my manual big shot – but I got the amazing result of the pieces simply falling out when I ran my fingers over them.

I haven’t even told you the best part – the chrome plate is just as shiny and perfect as when it came out of the packet – there are no scratches or indentations from the die cutting. WOW again!

PLEASE NOTE: The Chrome Precision plate cannot be used with the Big Shot Foldaway or Big Shot Plus. Also, it should only be used with intricate dies rather than those with large openings.


OK, I then had the fun of creating cards, so here’s what I did.

I cut the Waves from a piece in my stash – I had a previous failed attempt with watercoloring using Nuvo Shimmer Powder Atlantis Burst, but it did result in a pretty coloured and shimmery piece, perfect for cutting up!

I used the Hero Arts Colour Layering Turtle along with the Thanks stamp and die sets. The turtles were stamped with a selection of mini ink cubes in my stash – I don’t own a complete collection of any particular line of inks and I have happily collected all sorts to experiment with. (I will link here to Jennifer McGuire’s ink swatching system to make it so much easier to select inks for colour layering from your own stash).

The blue turtle and seaweed are stamped with Catherine Pooler ‘It’s a Boy’, Gina K Designs Blue Raspberry and Ranger Cobalt Archival inks. The green turtle and seaweed are stamped with Altenew Bamboo, Gina K Designs Grass Green and Ranger Library Green Archival inks.

I fitted the turtles and seaweed on the card, stacked the Thanks with white and silver glitter cardstock and finished the sentiment with white heat embossing on a black strip.

The card is finished off with Studio Katia silver gems.


The Mermaid is from left over from my weekend of learning to colour darker skin tones in my goal to be more diverse in my card making (you can check out that blog post here). I thought she would look super cute sitting on the clamshell card front and I finished this card off with a sentiment from MFT Sweet Sentiments and Pretty Pink Posh Party Mix jewels in the openings – to match the colour of the alcohol inking behind.

PLEASE NOTE: I purchased my clamshell die from Simon Says Stamp fairly recently, but it doesn’t seem to be available anymore anywhere – my apologies if I got you excited about this die!

Copics Used:
Skin: E27, E25, E23, E21; Hair 100, E49, E57;
Clothing: RV66, RV09, RV06, RV04;
Rock: W9, W7, W5, W3;
Shell: R85, R56, RV34;
Fish: YR18, YR16, Y15;
Turtle: G09, G05, YG06, YG03, YG67 YG63, YG61


The Heart Mandala is quite a statement piece, and I kept the rest of this card nice and simple, by adding a silver and black birthday greeting and placed Studio Katia silver gems to finish.


That completes my cards today. Scroll down a little more for the GIVEAWAY portion of today’s blog! Below are links to the products I have used – some are affiliate links (not all) which simply means I may get a small commission at no extra cost to you when shopping. Thank you for your support – it means I can keep creating and sharing with you.

https://linkdeli.com/widget.js?id=f5e8378456858c916708

GIVEAWAY!

Thank you for visiting my fledgling blog! I have this prize of the Avery Elle Waves Background die featured above, a slab of Whittaker’s Milk Chocolate (made right here in my own home town of Porirua, New Zealand!) plus a bunch of my Christmas Gift Tags so you will be all set for the upcoming festive season.

To enter, please leave a comment and follow my blog by entering your email address below (email address required to contact the winner!)

Giveaway is open worldwide to anyone who is 13 years or over. This giveaway is not sponsored, administered or endorsed by Instagram, Facebook or WordPress. Your information will not be shared with any other party. Please be aware that shipping delays are inevitable due to the Covid-19 pandemic.

The prize draw will take place midday (NZT) on Saturday 20 June and the winner will be announced both here and on Facebook and Instagram.

I will do my best to contact the winner directly. If the prize is not claimed within 7 days, it will be redrawn on June 27, 2020 NZT.

If you are interested in card making fun, future giveaways, product reviews, where to get the best goodies or my upcoming classes please follow me on my social media channels:
Posted on 2 Comments

Skin Colour Combinations

I have taken a few colouring classes over the past couple of years, both free and paid, and a high priority was to learn to colour skin and hair. Here is a link to my Colouring Resources Page which contains links to classes and tutorials I have done and can definitely recommend.

Colouring people and other characters such as mermaids are super fun, but in light of recent events, it occurred to me that I had not yet extended my colouring palette to include people of different nationalities (or even a sun tan!). This is something I had always intended on sitting down and working out but hadn’t actually taken the time, which, when I think about it is very short sighted, as New Zealand is a very multi-cultural country! I hope that by doing this exercise I continue to have a more accurate and inclusive portrayal of people both in my own community and further afar.

Hair colours on the left, skin tone on the right
Hair colours on the left, skin tones on the right.

This is a page from the free Markers 101 Class at Kit & Clowder (suitable for all alcohol marker types). There are many other little freebie classes and digital images, I definitely encourage you to visit the Kit & Clowder community – either via Facebook or their website.

I had previously coloured the top four images as part of my original class. I still consider myself a beginner colourist, and have only been practicing my colouring on small images and stamps for cards for around 2 years or so.

So I got my workbook back out, tried out some colour combinations and filled in my final decisions for the bottom two images. My goal for now is to get out of my comfort zone of reaching for my habitual choices of colour and really think about what I’m representing in my projects.

Now to flex these skills!

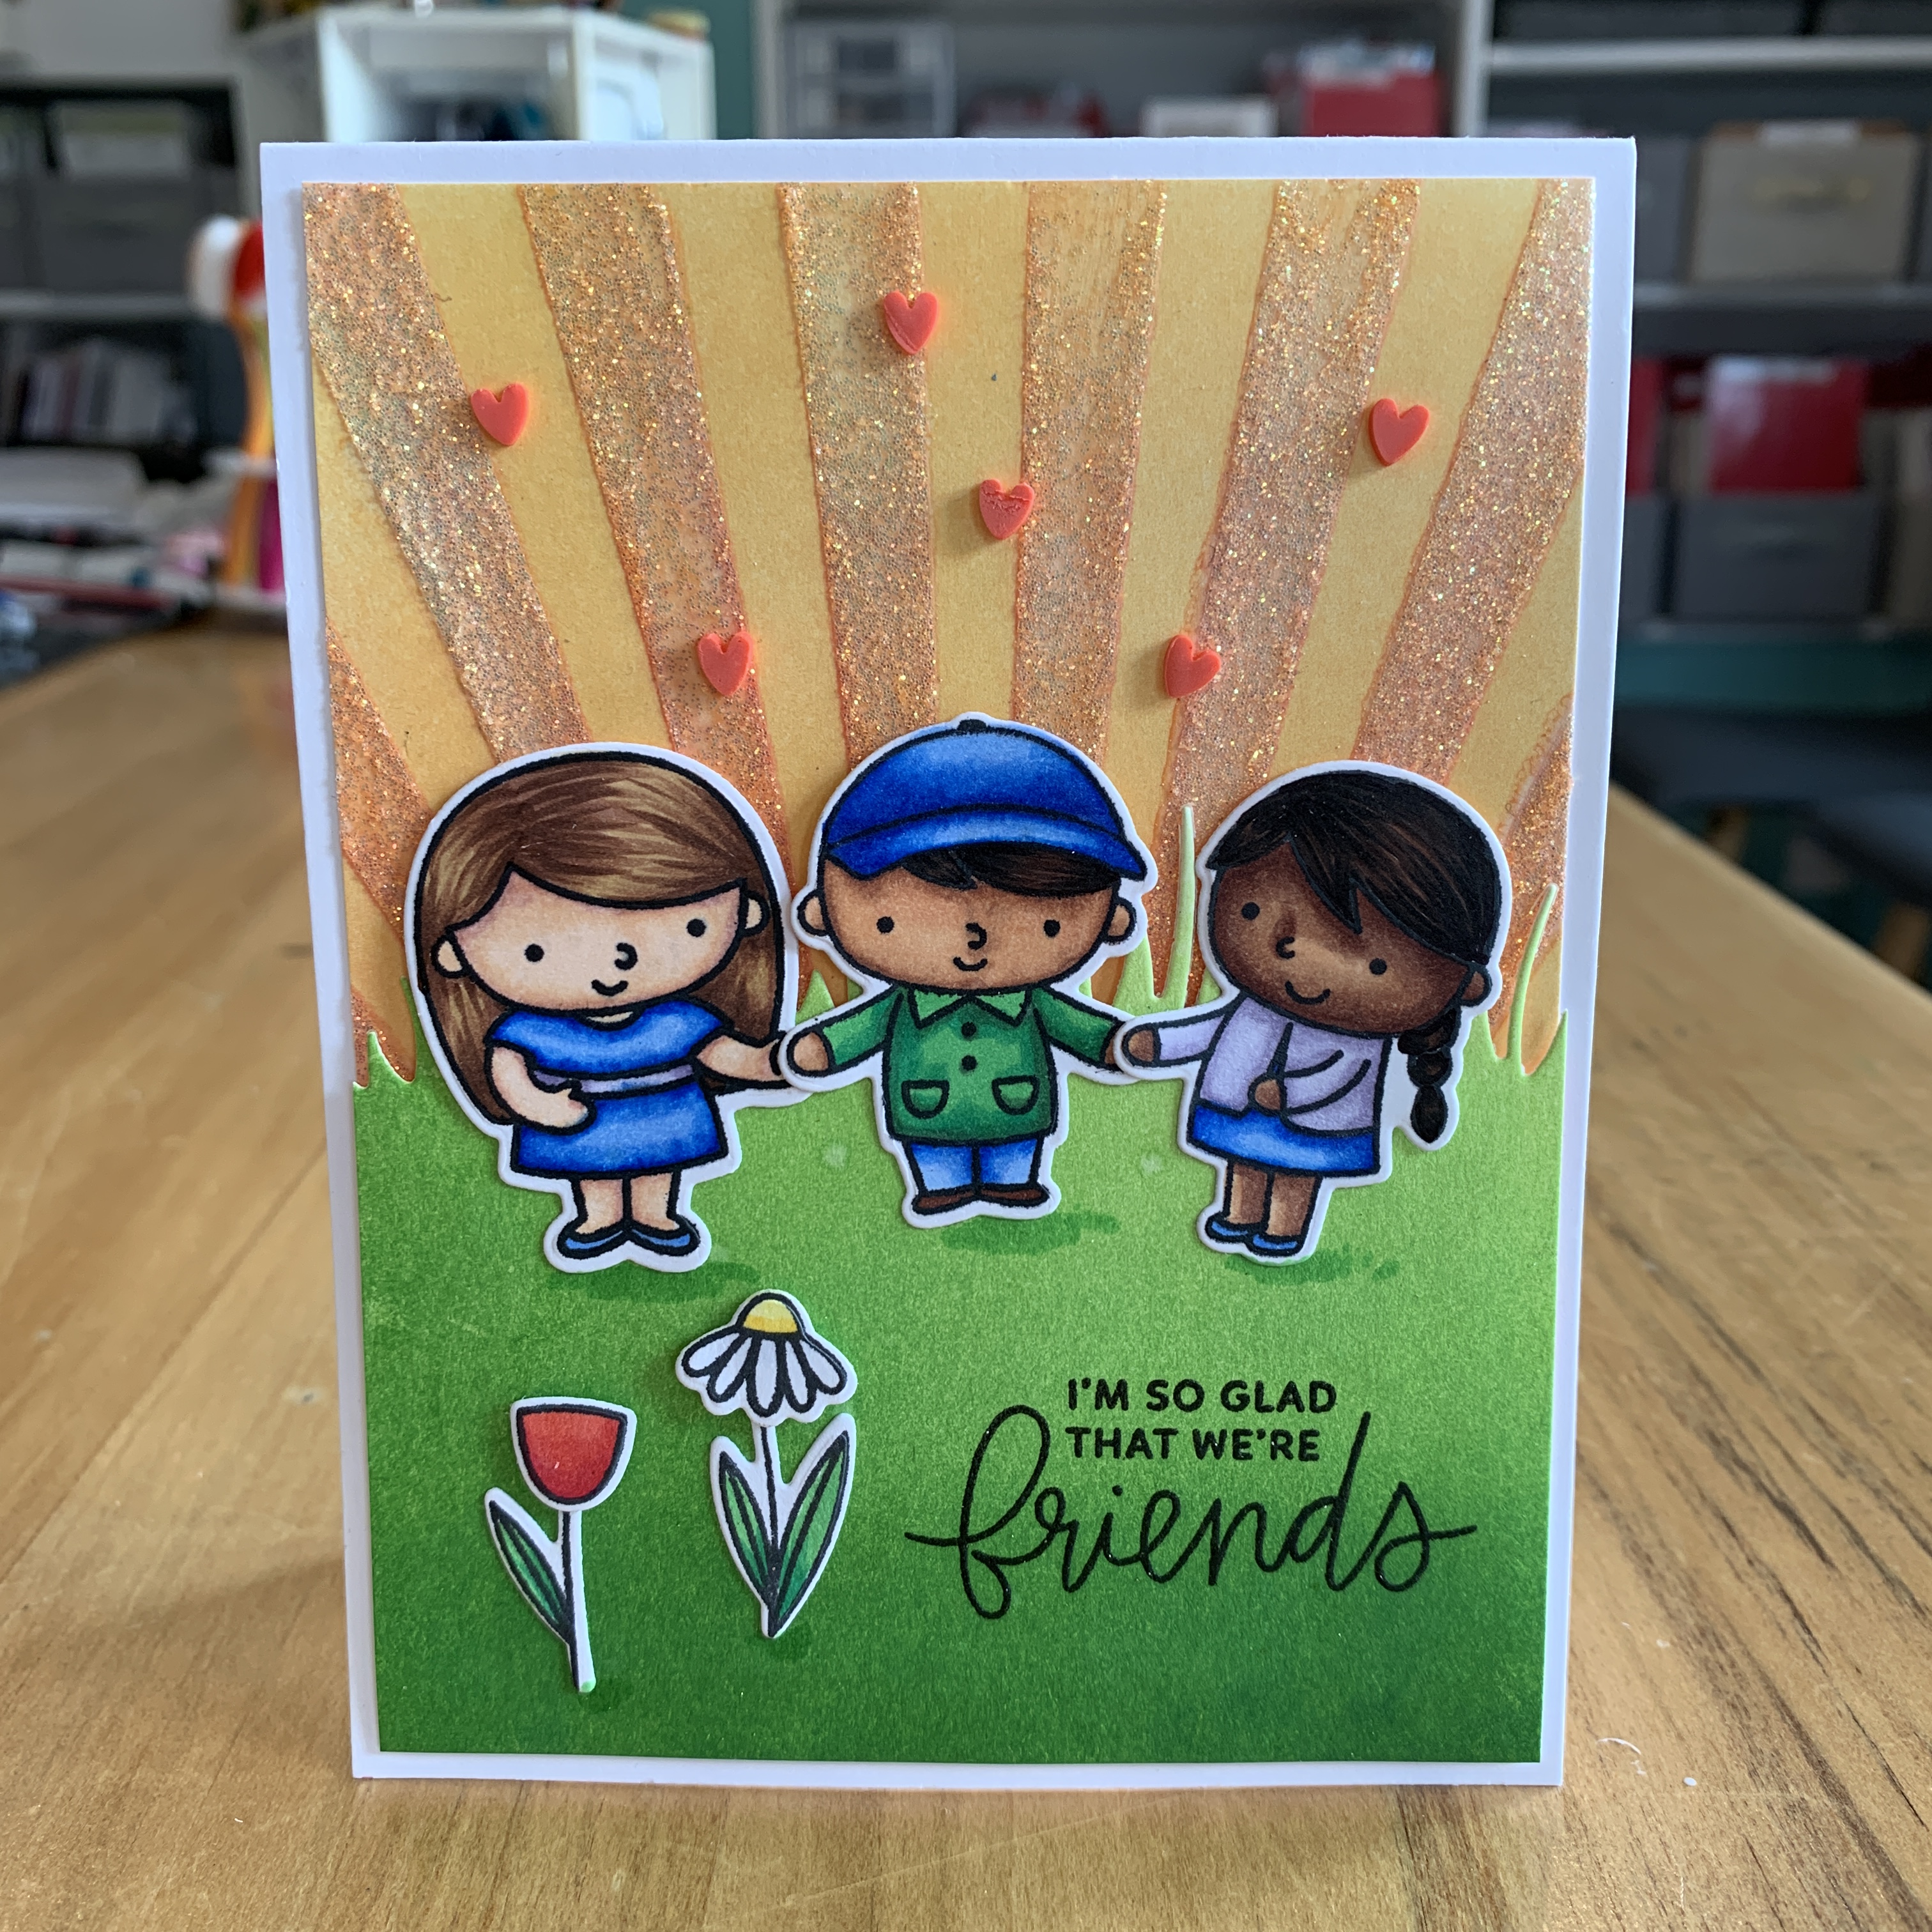
Pretty Pink Posh have very cute people stamp sets with simple line designs, they suit many card occasions, and they’re the ones I reached for today in order to practice my new combinations.

Another stamp set I regularly colour are the MFT Mermaids, so I decided to colour one of these up as well.

Shimmer was also added to the Friends with the Nuvo Aqua Glimmer pen.

For this card, I stencilled the sky using Distress Inks in Worn Lipstick and then Squeezed Lemonade over the top of that, plus a layer of Gina K Glitz Glitter Gel.

I distress inked the grassy hill with Mowed Lawn and Twisted Citron. I added a bit of foam to the back of this piece, arranged my friends and stamped the sentiment. I added the little flowers which are included in one of the stamp sets, and scattered some clay hearts from Honey Bee Stamps.

Copics Used:
Skin: Girl 1 – E04, E11, E21, E00, E000; Boy – E27, E25, E23, E21; Girl 2 – E29, E27, E25, E23, E21;
Hair: Girl 1 – E59, E57, E55; Boy & Girl 2 – 100, E49, E59
Clothing: B28, B24, B21, G09, G14, YG06, V25, V22, V20;
Flowers: Y18, Y15, R29, R27, R24, C1, C0


This card front is die cut with the largest MFT stitched rectangle and an Avery Elle wonky rectangular frame was die cut a few times, stacked and textured pattered paper popped in for the background.

The same patterned paper was used for the top layer of Kindness. I also added shimmer with a Nuvo Aqua Glimmer pen to the people and the Kindness die cut.

Copics Used:
Skin: Girl – E27, E25, E23, E21; Boy – E04, E11, E21, E00, E000;
Hair: Girl – 100, E49, E59; Boy – E23, Y26, E55, E53;
Clothing: B28, B24, B23, BG57, BG45, BG10, RV66, RV17, V04

Unfortunately the Kindness stamp and die set has been discontinued by MFT but I was lucky and managed to find it at Frantic Stamper earlier this year. Frantic Stamper is a US retailer and brilliant for sourcing hard to find, discontinued stamp sets as well as all the current goodies. At the time of publishing this blog, this set was still in stock with them and I have provided a direct link below.


Images from MFT Mermazing

I love making cards with mermaids, and this My Favorite Things Mermazing set is definitely one of my most favourite. It is one of the first stamp sets I ever purchased from MFT!

I’ve coloured her up thus far, and will include her on a card in the near future.

Copics Used:
Skin E27, E25, E23, E21; Hair 100, E49, E57;
Clothing RV66, RV09, RV06, RV04;
Rock W9, W7, W5, W3;
Shell R85, R56, RV34;
Fish YR18, YR16, Y15;
Turtle G09, G05, YG06, YG03, YG67 YG63, YG61

This completes my cards and colouring skill practice today. Thank you for stopping by! Below are links to the products I have used – some are affiliate links (not all) which simply means I may get a small commission at no extra cost to you when shopping. Thank you for your support – it means I can keep creating and sharing with you.

https://linkdeli.com/widget.js?id=f5e8378456858c916708

If you have any questions regarding the putting together of any of these cards, please feel free to message me – I’m only too happy to help!

Posted on 1 Comment

Frozen Shaker

I may have one of the only little girls in the world NOT obsessed with the Disney Pixar movie Frozen, but we still know who Elsa and Anna are! This entire card is one of those ‘one thing led to another’ scenarios.

The invitation in question – sans personal details. I was taken with the swirly purple, blue and pink tones together.

Amelie was invited to her little friend’s birthday, and the invitation was Frozen themed. I really liked the beautiful mix of colours swirling in the background of the invitation and wondered if I could recreate something like it myself. My first attempt was with alcohol inks, and funnily, was the most successful. Isn’t it weird when we try something the first time and it works amazingly, that subsequent attempts don’t? A couple of spectacular failures happened, that’s for sure.

Supplies used:

Gina K Designs Snowflake Background Stamp
Tim Holtz Alcohol Inks

I started off by white heat embossing the snowflake background onto the Alcohol Ink Cardstock. This is no different to heat embossing on regular cardstock, but always pays to be careful.

It is possible to heat emboss on Yupo paper – you must let your heat gun warm up for a wee while to get it properly hot, and heat the Yupo carefully. You gently move the heat gun across the paper without letting it heat too much in one spot, taking the heat away and bringing it back. Being this careful, it takes a little longer than heat embossing regular cardstock, but it is certainly worth the effort.

Alcohol ink is super fun to play with – so far everyone who has tried this at my craft table has become rather addicted! You do need some blending solution to really get the ink moving and a straw. Although you could use isopropyl alcohol (available from pharmacies), it does have a different result, so it pays to play. You could use an ink blending tool with felts instead of foam, which again gets different results. I ended up creating a few background pieces to keep in my stash – even failures can be cut up with word dies or something similar!

Once I had splashed about with the inks, I decided to cut up the birthday invitation! (I took a photo of the pertinent details first 😉 ) I carefully fussy cut Elsa and Anna from the back of the invite.

Placement was tricky to decide as I thought having the characters sit centrally would look better than having them sit directly at the bottom of the panel, but didn’t want them to look too obviously cut out from somewhere else!

The front of the invitation – I cut just above the gold symbols and fussy cut around the hair and shoulders.

I figured the best way would be to create a nice large window opening for them, which then led to creating a shaker card.

I die cut my panel with a stitched rectangle die, and then the curved window opening. Elsa and Anna are sat within the window, on top of the acetate, with strategic snips in their hair to make it look like they are standing in front of the window.

Part way through……..

A shaker requires acetate and foam strips to create a compartment to keep all the confetti and sequins in place. I wanted a bit of depth to allow space for beads and sequins to move freely. Stampin Up foam strips are a little deeper than other strips on the market, and they suited this purpose. You could simply have two layers of foam strips if you want depth for your shakers.

I sat and stared at it for a bit, and thought it just needed something GLITTERY.

Amelie and I then had fun cutting a bunch of snowflakes from various sets in my stash, choosing the smaller snowflakes from each. We die cut from white cardstock, silver, and vellum and played with creating the top of the window opening. Gems were added too, because why not! You only turn 4 once 🙂

I glued the shaker to a lilac coloured card base which finished this card in a pretty way. I included this card with a gift of a beautiful Elsa dress up costume – and we had fun at the party!

Bonus…..

Amelie’s card for Jamez

Amelie also created her very own card using some of the snowflakes she cut with me – here it is in all its glory. It is for the birthday girl’s big brother! I LOVE how she loves snowflakes 🙂

Didn’t she do well?

If you have any questions regarding the putting together of this card, please feel free to message me – I’m only too happy to help!

Posted on Leave a comment

It’s a Monster Ride!

This is a Happy Birthday to my nephew Max – he is turning 5, which means SCHOOL! This pair of Scary Pals from Avery Elle are racing to join in with his birthday celebrations, complete with gifts and balloons.

The outer frame is the Grand Photo Mat. This single die cuts all the pieces at once – the frame, the background scenery hill pieces and clouds. It also has a pretty line of embossed dots around the edge of the frame window. You can colour the pieces up however you like and put them back together, just like a puzzle. You could leave the background scenery out altogether, and instead have a brilliantly large photo frame.

I stamped the images with Gina K Amalgam ink. This ink is my top choice as it suits just about all mediums for adding colour, from alcohol inks, to pencils and watercolour, without smudging or smearing. You can stamp images and colour them months later and not have to worry about which medium you can and can’t use.

Flicks of the marker can create the look of fur

Copics Used:
Car & Red Balloon – R59, R29, R27, R24,
Tyres & Grill – C9, C7, C5, C3, C1
Headlights and Sky – B00, B000
Driver – BG78, BG75, BG72
Passenger – Y38, Y18, Y15, Y11
Gift – YR16, YR15
Balloon & Hills – G28, G09, G05, G03

I then cut them out with the matching dies – there are separate stamps and dies included in the set for their paws for extra fun.

The Happy Birthday was stamped along the bottom using Versafine Pigment ink – I like to use this ink for my black sentiments as it stamps in a crisp, dark black, and I clear heat emboss for a nice shiny finish. I prefer this method than heat embossing a sentiment directly with black embossing powder – very hard to achieve the same tidy result.

Glittery shiny finishes

Other finishing touches include Nuvo Glitter Gloss pen on the balloons, Nuvo Crystal Glaze on the balloons also, as well as the head lights and the driver’s eyes.

The Scary Pals were carefully secured to their car along with their gift and balloons, and the entire car is mounted onto the background with foam tape – on a slight angle to infer speed and a sense of excitement!

The card front is adhered to a card base of Neenah #110 white cardstock and this complete’s Max’s birthday card! Amélie was super excited to give this, along with a gift, to her cousin and celebrate with him.

Links below to products used, including NZ shops where I can. Please check with your local craft store and see if these products can be ordered in for you directly as I do like to support our small businesses where possible. Otherwise, these links will take you to where they are currently available. Some are affiliate links – this means I get a small commission from the store when you make a purchase, at no additional cost to you. This helps to keep my blog and craft activities going, so thank you for your support!

https://linkdeli.com/widget.js?1559654439292

For handy information about the best value supplies for your craft table, from cardstock and inks to the most useful tools, check out my Best of the Basics series.

If you have any questions regarding the putting together of this card, please feel free to message me – I’m only too happy to help! Thank you for visiting 🙂