I think I have managed to sneak this card into this week’s My Favorite Things Sketch Challenge at almost the very last minute! I have been working some other cards using this particular stamp set this past week, and I decided to use it again while it was on my table to create this card.
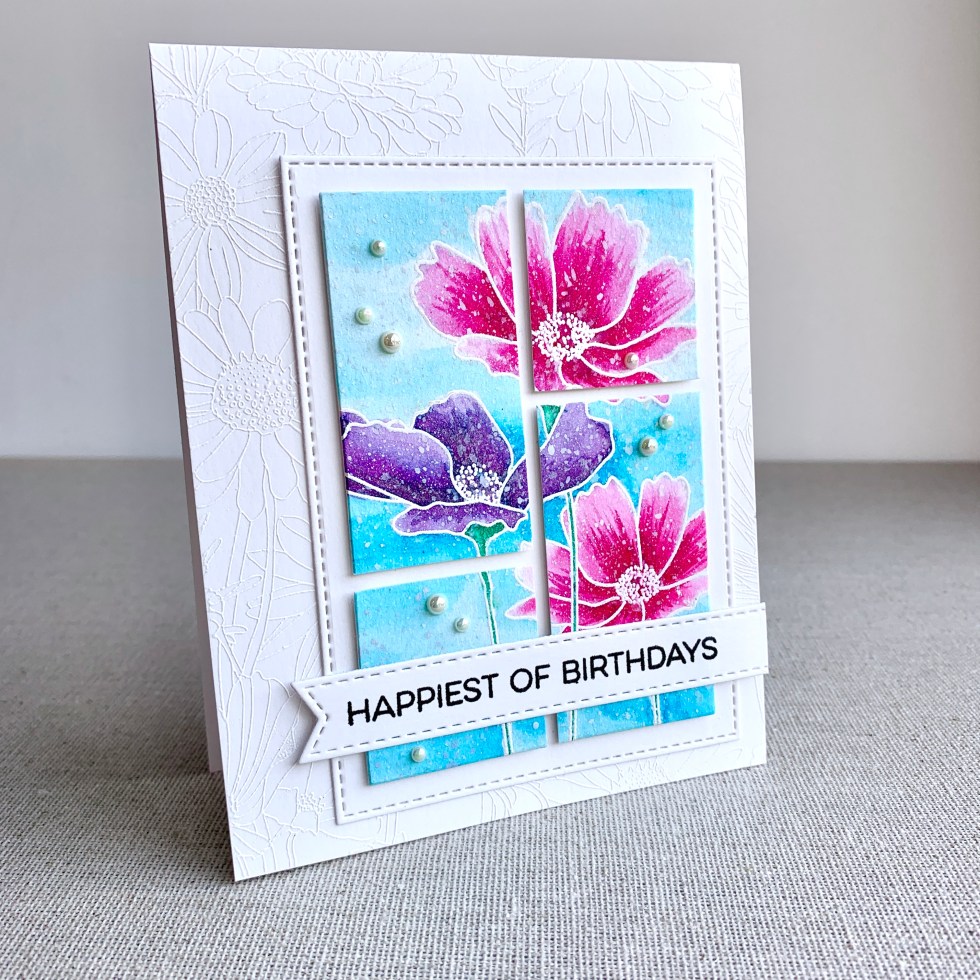
I stamped the Flowers in Bloom on watercolour cardstock and had fun painting them using Nuvo Shimmer Powders.
The colours I used are Cherry Bomb, Violet Brocade, Blue Blitz, Atlantis Burst. I squeezed a little powder into a watercolour palette pan, and picked up the colour with a wet paintbrush. A very easy way to watercolour!
I spritzed the panel with a little shimmer spray and some white gouache splatter.
The Sketch Challenge was set out with four panels to the bottom right of the card and a sentiment strip. Rather than colour four different images, I cut my panel into four – carefully removing a strip from the vertical centre and then horizontally on each of the resulting panels – all the while ensuring the image was not distorted. Many pencil marks and ruled lines on the back of this!
I die cut a further stitched rectangle to mount the pieces back together with foam tape for a little bit of gentle dimension.
The card base itself is Strathmore Bristol Smooth cardstock – it is a warm creamy colour and I find it matches very well in tone with the watercolour cardstock I use. You can also use Tim Holtz watercolour paper which is a much brighter white which matches with Neenah cardstock much better.
I felt the card base itself needed a little lift, so I white heat embossed a large background stamp, Flower Fields.
This gives the card a little interest without detracting from the focal image.
I heat embossed a sentiment, using Happiest of Birthdays from the More Essential Sentiments set and placed the strip towards the bottom right. A few wee Studio Katia pearls finishes off this pretty card.
You can enter this week’s Sketch Challenge too – click here to visit the My Favorite Things blog with all the details.
If you’ve never shopped directly with MFT before, you can click here to get $10 USD off your first purchase!
This completes my pretty card today. Thank you for stopping by! Below are links to the products I have used – some are affiliate links (not all) which simply means I may get a small commission at no extra cost to you when shopping. Thank you for your support – it means I can keep creating and sharing with you.
For more in-depth information about the best value supplies for your craft table, from cardstock to the handiest tools, check out my Best of the Basics series.
Welcome! Today I am excited about a product in my stash which I want to share my success in using it with you – including the resulting cards. Plus, right at the end is my giveaway for you to enter – GIVEAWAY CLOSED – Winner: Grace W, NZ
We all have those dies in our collection – we saw something pretty and bought the intricate die thinking of all the amazing cards to be made. Only to discover yes they’re pretty, but also pretty labour intensive to get a complete and nice cut! I like to stack my die cuts too, making some of the card making processes verrrrry frustrating! I have constant battles with those little ‘ripped out’ corners or having to carefully run through again and again, and simply untidy edges after all the effort. Maybe it’s my cardstock? Do my plates need replacing?? Perhaps I need a whole new machine??? Or maybe it’s just me………?
I have to admit, I purchased the electronic BigShot Express earlier this year and I’m definitely loving it – it has handled intricate dies quite nicely, but now I have found something to really make intricate die cutting a BREEZE.
The Sizzix Chrome Precision Base Plate
It’s like a bright shiny mirror straight out of the package and I was hesitant to scratch up that pretty surface. However, I needed a pretty die cut for a card idea and I knew from past experience that there were a couple of tricky spots so I thought I’d try it out on the Chrome Plate. Well. One pass and all the little pieces just FELL OUT when I ran my fingers over them – didn’t even need my pokey tool. WOW.
So this morning, I got out the worst culprits when it came to die cutting – very intricate background dies from Avery Elle (waves), Crafter’s Companion (clamshell) and Simon Says Stamp (Heart Mandala). DISCLAIMER: There is nothing wrong with these dies, they just needed an extra shim, or a few extra passes through my machine to get allllll the pieces out.
The Sizzix globe is featured here, but I didn’t have time to turn it into a card today.
The Heart Mandala pieces came out so easily!
I ran them through on the chrome plate – out of habit I did two passes on my manual big shot – but I got the amazing result of the pieces simply falling out when I ran my fingers over them.
I haven’t even told you the best part – the chrome plate is just as shiny and perfect as when it came out of the packet – there are no scratches or indentations from the die cutting. WOW again!
PLEASE NOTE: The Chrome Precision plate cannot be used with the Big Shot Foldaway or Big Shot Plus. Also, it should only be used with intricate dies rather than those with large openings.
OK, I then had the fun of creating cards, so here’s what I did.
A distress oxide background and the Avery Elle Waves die.
Alcohol inked background with the Crafters Companion Clamshell die
Alcohol inked background piece with the SSS Heart Mandala die
I carried on die cutting my card front pieces.- each one is stacked at least twice, the SSS Heart Mandala is stacked three times.
I cut the Waves from a piece in my stash – I had a previous failed attempt with watercoloring using Nuvo Shimmer Powder Atlantis Burst, but it did result in a pretty coloured and shimmery piece, perfect for cutting up!
I used the Hero Arts Colour Layering Turtle along with the Thanks stamp and die sets. The turtles were stamped with a selection of mini ink cubes in my stash – I don’t own a complete collection of any particular line of inks and I have happily collected all sorts to experiment with. (I will link here to Jennifer McGuire’s ink swatching system to make it so much easier to select inks for colour layering from your own stash).
The blue turtle and seaweed are stamped with Catherine Pooler ‘It’s a Boy’, Gina K Designs Blue Raspberry and Ranger Cobalt Archival inks. The green turtle and seaweed are stamped with Altenew Bamboo, Gina K Designs Grass Green and Ranger Library Green Archival inks.
I fitted the turtles and seaweed on the card, stacked the Thanks with white and silver glitter cardstock and finished the sentiment with white heat embossing on a black strip.
The card is finished off with Studio Katia silver gems.
The Mermaid is from left over from my weekend of learning to colour darker skin tones in my goal to be more diverse in my card making (you can check out that blog post here). I thought she would look super cute sitting on the clamshell card front and I finished this card off with a sentiment from MFT Sweet Sentiments and Pretty Pink Posh Party Mix jewels in the openings – to match the colour of the alcohol inking behind.
PLEASE NOTE: I purchased my clamshell die from Simon Says Stamp fairly recently, but it doesn’t seem to be available anymore anywhere – my apologies if I got you excited about this die!
The Heart Mandala is quite a statement piece, and I kept the rest of this card nice and simple, by adding a silver and black birthday greeting and placed Studio Katia silver gems to finish.
That completes my cards today. Scroll down a little more for the GIVEAWAY portion of today’s blog! Below are links to the products I have used – some are affiliate links (not all) which simply means I may get a small commission at no extra cost to you when shopping. Thank you for your support – it means I can keep creating and sharing with you.
Thank you for visiting my fledgling blog! I have this prize of the Avery Elle Waves Background die featured above, a slab of Whittaker’s Milk Chocolate (made right here in my own home town of Porirua, New Zealand!) plus a bunch of my Christmas Gift Tags so you will be all set for the upcoming festive season.
To enter, please leave a comment and follow my blog by entering your email address below (email address required to contact the winner!)
Giveaway is open worldwide to anyone who is 13 years or over. This giveaway is not sponsored, administered or endorsed by Instagram, Facebook or WordPress. Your information will not be shared with any other party. Please be aware that shipping delays are inevitable due to the Covid-19 pandemic.
The prize draw will take place midday (NZT) on Saturday 20 June and the winner will be announced both here and on Facebook and Instagram.
I will do my best to contact the winner directly. If the prize is not claimed within 7 days, it will be redrawn on June 27, 2020 NZT.
If you are interested in card making fun, future giveaways, product reviews, where to get the best goodies or my upcoming classes please follow me on my social media channels:
20 to be exact! My daughter Stella is leaving her teenage years behind….
She has always been a fan of pandas, so a bit of artistic fun was had altering Bill the Bear from Honey Bee Stamps. I will show you below how I altered the stamp and coloured him up.
Before we start, I will point out that the background pieces I have used are from a previous alcohol ink lifting session – here is a link to Jennifer McGuire‘s blog (and video with lots of examples) showing this fun and incredibly easy technique.
I used the Lifted Ink panel on the bottom for the Panda card, and the top panel is on a bonus card featured at the end of this blog post.
I clear heat embossed the Simon Says Stamp Leaves & Berries stamp on my alcohol inked panel, spritzed with isopropyl alcohol (available from pharmacies). I then laid a piece of white cardstock on top and ran them through my die cutting machine (no dies were involved in this) – the ink transferred from the Yupo paper (top) to the cardstock (bottom).
This left me with two gorgeous inky backgrounds to turn into cards.
Of course, you can ink up any background panel you like, with any colours. Or even use patterned paper if preferred. The beauty of a black and white bear, is he matches any colour choice!
I stamped Bill the Bear on his own and marked out with pencil where I wanted to add the black markings to turn him into a cute panda bear.
Using my Copic markers, I used gentle flicks to add colour both from the bottom and from the top of the midsection. I started with C9, then added flicks of C7 and C5 to meet in the middle. This gives a bit of texture to his fur.
I then went back and started with 100 (Copic Black) and did a second layer of flicks, then C9, C7 and C5 again to add extra depth. The same was done on his legs and arms. I coloured his ears and eye patches with black and C9 markers.
Later in the project, I felt the line on the midsection of his tum was a little harsh, so I added further flicks of C9, C7 and C5 going downwards to soften it up a little.
I played with placement for my panda, and decided a frame with a nice large sentiment would work for this card.
I chose the frame (die cut and stacked three times) from Mama Elephant Snail Mail, and the gorgeous Oh So Many Birthday Wishes stamp from Picket Fence Studios.
Look at that smooth gold!
I heat embossed the sentiment not once, not twice, but THREE times (use your stamp platform or Misti for this). It is a complete sentiment stamp at a brilliant size to be a focal point on any project.
Embossing three layers of powder helps the sentiment stand out a little more from the colourful background. I love taking any opportunity to emboss multiple layers for impact and get that raised, but smooth look.
At this stage, I felt the panda needed a couple of accessories to make him look like he was actually enjoying the festivities. Bill the Bear stamp set does include a number of fun accessory stamps and they are aimed at the outdoorsy type with images such as log fires, honey collecting, fishing and even toasting sausages and marshmallows. There are even a couple of cute vest options and a bow tie to dress him up! As cute as those are, they didn’t fit the theme of my card today, so I did have to look through my stash for appropriate sized party type accessories.
The balloon string is tucked into the slit of his paw.
I added a balloon and a gift from the Ellen Hutson Bear Ware stamp set, and coloured them in bright red. I used R59, R29, R27 and R24. The bear die cuts little slits on the bottom of the paws, so it was easy to attach some crochet thread under his paw for him to hold his party balloon.
The gift is slotted in under his other paw. They are a perfect size to match Bill the Bear.
Final details are added, Nuvo Midas Touch gold glitter pen to the balloon and gift, glaze pens on the eyes and nose – I love the extra shine and sparkle this adds.
Double sided tape comes in a variety of widths from 0.25″ up to 6″ wide!
I use Art Glitter Glue for just about every thing when I craft, but I do like to use wide double sided tape when attaching my card fronts to foam and card bases. Sometimes inky panels have a bit of a kink in them, making them difficult to smooth out with just glue.
I put my tape as close to the edge and corners as I can, and this ensures an even adhesion with no bubbles along the edges of the panel.
Bonus Card
With the other inky panel, I decided to create this quick and easy card. I simply trimmed the panel down and adhered it to a card base with foam in between.
I cut the Mama Elephant ‘happy’ nine times – stacked three each and arranged them on the front with a tiny birthday sentiment heat embossed in white and added a few gems for sparkle.
This completes my festive party cards today. Thank you for stopping by! Below are links to the products I have used – some are affiliate links (not all) which simply means I may get a small commission at no extra cost to you when shopping. Thank you for your support – it means I can keep creating and sharing with you.
A nice bright cheery card to send to someone, Just Because. It’s always nice to receive a surprise in the mailbox, especially when it isn’t expected!
Today’s card has a small colour palette – I have used just two colour families, Cool Greys and Yellows on top of a ‘white on white’ background.
If you are considering jumping into using Copic Markers, these two colour families would be a great start. Of course, you can use any colouring medium you are comfortable with to achieve a similar result.
I started off with the Honey Bee Stamps Hexagon cover plates – I used just the top two today (the very bottom layer is on a future shopping list).
I cut them from 80lb white cardstock and glued the two layers together. The card front is then adhered to my base – I prefer Neenah 110lb for my card bases, but you can use whichever you prefer.
I stamped and die cut my images, plus I die cut the letters for BEE four times each and stacked them together. This alphabet die set is a brilliant size, and beautiful font, I find I reach for it a lot.
The Busy Bees set includes dies for flower stems, I simply cut these without stamping the matching image and coloured them in green (YG09).
Yellow combo for flower centres and letters
Palest greys for flower petals
Yellows and darker greys for buzzy bees
You can use any combinations of greys and yellows you have in your stash. For this project, I used C9, C7, C5 and Black on the buzzy bees, along with Y35, Y18, Y5, Y13, Y11. The same yellow combination is used on the letters and flower centres. Plus C3, C1 and C0 to add shadow to the flower petals and wings. You could cut the top layer of the letters from yellow or patterned cardstock too, which would be a fun result.
When colouring with Copic Markers, it is important to use the right cardstock – Neenah or Copic X-Press It are my top choices and they give smooth results, making it easier to blend your colouring as the cardstock can handle the amount of ink being laid down.
I start with my darkest colour and colour from the outside in with little flicks. The next colour is added by using the same small flicks over the dark colour and extending it out and same again with the lighter shade. Do the same from the other side of the section you’re colouring. If you leave gaps between your flicks, you can achieve a more textured look (think hair or fur), but in this case I wanted a smooth blend.
Copics are a bit of an investment, and it can be daunting when you’re just starting out with your collection. When adding a new colour family to your collection, try to add in groups of 3 – a dark, medium and light shade of colour. I will link here to some online colouring resources, (including free and paid) classes and charts for your reference.
There are a number of Copic suppliers in New Zealand – Gordon Harris, Ribbon Rose, Scrapbook Central are the main retailers that I personally purchase from – all three have online shopping facilities. Check your local craft supplier or art store too.
I also have further information about Copic Markers, plus other ways of adding colour to your projects here.
A close up of the stacked letters and their shiny, sparkly glory!
I added some sparkle with the Nuvo Aqua Shimmer Gloss pen and a layer of Nuvo Crystal Glaze for shine.
Wink of Stella pens and Ranger Glossy Accents or Nuvo Morning Dew Drops would give similar results if that’s what you have. I have linked both options below.
I stamped and white heat embossed the Just and Cause to add above and below to complete the sentiment.
The letters and sentiment additions are glued directly to the card front. The bees and flowers are attached to the card front with foam squares within the hexagon gaps. I glued the flower stems to sit underneath my flower heads, cut down to size – there was plenty left to spare from the two stems I had prepared.
Final touches include glaze pens and fineliner for the eyes, smile and tops of the antennae.
PRO TIP: Wait for your sparkle pen to dry before adding black glaze – I ended up with a bit of a feathered look on one of the bees and one of the antenna. Whoops!
I also added sparkle and glaze to the flower centres.
This completes my bright and cheerful card today. Thank you for stopping by! Below are links to the products I have used – some are affiliate links (not all) which simply means I may get a small commission at no extra cost to you when shopping. Thank you for your support – it means I can keep creating and sharing with you.