Posted on 2 Comments

Ornate Floral Shaker

It’s a crafty friend’s birthday – Happiest of Birthdays to Julie! She makes amazing cards (check out her Instagram) so I wanted to create a card that was extra special. Also, with all of my best stuff!

I made a pair of cards a few weeks ago with the Pinkfresh Ornate Floral die and wanted to step it up a little this time around.

I cut the Ornate Floral die three times from white, once from Gina K Grass Green and once from gold mirror cardstock.

I glued the dark green frame onto a light green card base – Sprout from the Concord & 9th sample pack of their newly released cardstock. I infilled the leaves with Grass Green and the flowers with white petals.

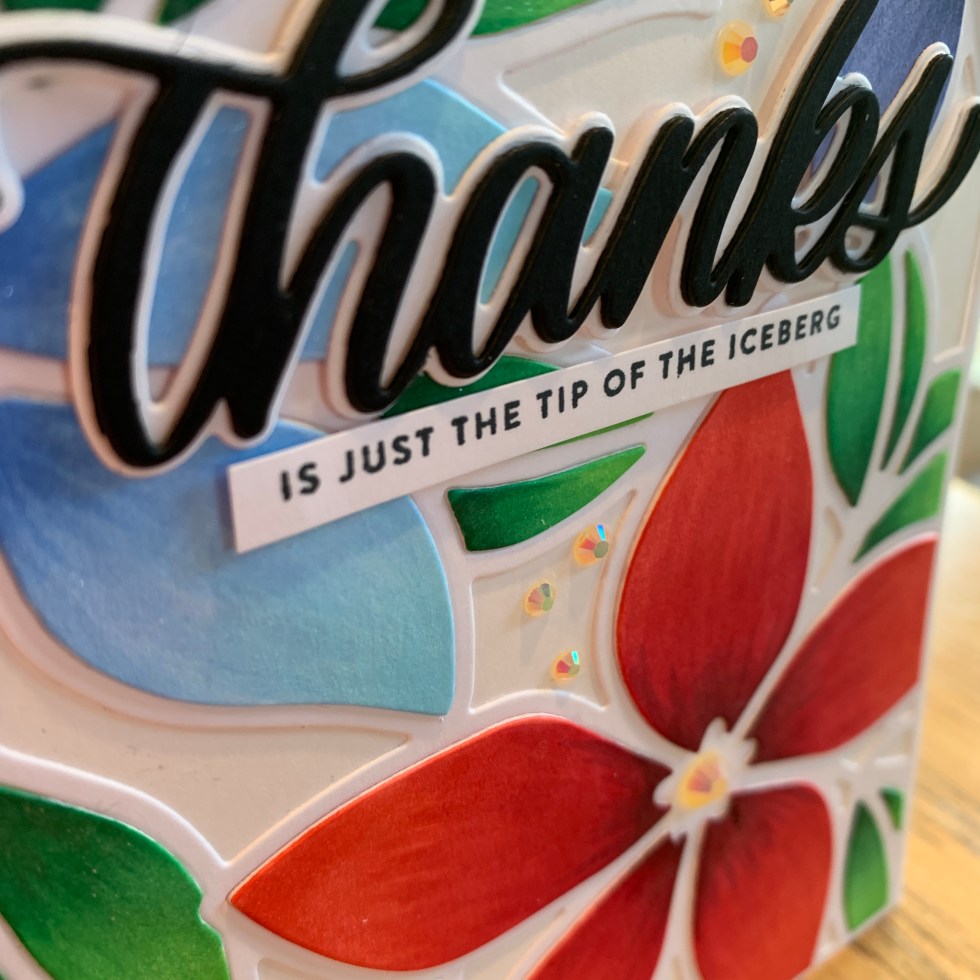
On my first attempt at this card, I had left the petals white, but the end result was too stark, so this time I coloured the petals with light Copic colours of the intended shaker pieces. You could use any marker or colouring medium here, just as long it has plenty of time to dry. As you can see, I didn’t do anything fancy, no shading.

Copics used: V12, B32, RV02, B00

I stacked the white dies together and glued the stack on top. The gold die cut is glued to the top of the acetate sheet, and kept aside.

Pro Tip for next step – ensure windows and doors are closed, and heat pump isn’t blowing!

I used Nuvo Confetti for my shaker elements, as I didn’t want my card to be too outrageously thick. To keep the confetti under some control, I covered the card where I didn’t want it to fall (with post-its and the acetate top), and carefully filled the petals and leaves with the appropriate colours. I found the Nuvo spoon great for this, as it has a narrow, funnel type end.

Any escapees were picked up with my jewel picker – surprisingly few escaped, even with my clumsiness!

The acetate window was placed on top, securing all those teeny pieces in their places. Relief!

I made sure all my stacked pieces were well secured, that confetti can slip through the tiniest gaps :/

I have kept the finishing touches super simple, as this card is a bit of a statement all by itself. I used the Pinkfresh Happy Birthday from the Classic Words set, cutting the shadow from platinum vellum and the words from Pitch Black and Grass Green cardstock, stacked a couple of times.

And final touch, glitter drops for the flower centres.

This completes my bright and sparkly card today. Thank you for stopping by! Below are links to the products I have used – some are affiliate links (not all) which simply means I may get a small commission at no extra cost to you when browsing/shopping. Thank you for your support – it means I can keep creating and sharing with you.

https://linkdeli.com/widget.js?id=f5e8378456858c916708

If you have any questions regarding the putting together of this card, please feel free to message me – I’m only too happy to help!

For more in-depth information about the best value supplies for your craft table, from cardstock to the handiest tools, check out my Best of the Basics series.

Follow me on my social media channels:

Posted on Leave a comment

Spellbinder Truck Cards

I got to have a serious play with the Spellbinders October Die of the Month (which has actually been released as a permanent fixture in the shop – yay!)

Now this is a LARGE set, and I will freely admit I was a little bewildered by all the teeny pieces! I realised I needed to watch a Nichol Spohr video to get myself untangled. She has a couple of really great YouTube video tutorials on the two different releases relating to these trucks – here and here. I really encourage you to take a look 🙂


So my first card was really a total CASE of her Christmas truck – there isn’t really anything to add, other than I used what I had in my stash in terms of appropriate sentiment (Simon Says Stamp Season’s Greetings) and scraps of cardstock. Also, the embossing folder I used is an old Stampin’ Up! one which really does look cool!


Then I got a little more confident and tried out a grey truck for a wedding card – again following a colour palette similar to Nichol, but I added my own twist. I really love the Simon Says Stamp Stacked Hearts die, and cut it from pearlescent pink cardstock to inlay into the card front. Little clay hearts from Honey Bee Stamps and a Congrats sentiment from PinkFresh Studio were the finishing touch.


The last card is a simple birthday card and I really wanted to do a blue truck with off-white bumpers, like a classic truck featured in a favourite Canadian television show (a chocolate fish if you guess the show!) The Happy Birthday is a My Favorite Things die (unfortunately retired), and the embossing folder is an old one found in my stash.


As you can see, the Truckin’ Along set can be used alongside many items in your stash, a great way to feature products that haven’t been used on a project in a while. Or ever! I’m sure I’m not the only crafter with things in my stash that have been purchased and not yet used!

Thanks for taking the time to visit! If you have any questions regarding the putting together of these cards, please feel free to message me – I’m only too happy to help!

For more in-depth information about the best value supplies for your craft table, from cardstock to the handiest tools, check out my Best of the Basics series.

Follow me on my social media channels:

Posted on 2 Comments

Ornate Floral Cards

When I saw this die in the new PinkFresh Studio release, I just knew I wanted to play with it. It takes a little longer to receive the newest goodies here in New Zealand, but I don’t mind being a little late to the party!

Here are the two cards I made today

Let’s start with the green card. I was aiming for a monotone look, and almost got there! I started with Lawn Fawn Peacock cardstock for the card front, and white Neenah for the remaining die cutting.

I cut it out a couple of times from white cardstock to start with, and glued a white frame to the Peacock card front. I built up the flowers a little by adding the white petals beneath the coloured ones – I think I ended up cutting it out three times in the end for this first card.

I then coloured the flowers I wanted with the other die cut, while all the pieces were still together. I find this makes it quite a bit easier to see what I’m colouring, I can do it quite messily and not worry about getting ink where I don’t want it. To keep the die cut pieces altogether and secure whilst colouring, I did use some strips of purple tape and post it tape.

I realised I wanted the leaves to have some depth of colour, to differentiate from the coloured card base a little. I cheated here, and coloured directly onto the card base with copics (BG78, BG49, BG09). As it was impossible to keep that original white die cut frame from getting inky bits on it, I ended up glueing a second white frame on top, and building up the flower petals again.

Copics used for the petals: BG45, BG13, BG10, BG000.

I added the coloured petals on top – and the depth and interest I achieved was pretty good!

I used my Nuvo glimmer gloss pen to add shimmer to the uncoloured parts of the card front and adhered it to a Lawn Fawn Mermaid card base.

To finish the card, I die cut the word Hello from Altenew three times, including one in silver, and stamped the sentiment from the Altenew Statement Flowers. I wondered about shortening the strip, but decided it looked good extending right across the card. I added ivory iridescent gems to the flower centres, plus a few extras scattered about, and this completes my card.


Rainbow Ornate Floral Card

Well, after I finished the first one, I immediately wanted to do another! This time, I wanted to try out more colour – a rainbow.

I used the remaining frame (complete with post it and purple tape strips) from before to do my colouring – I may just keep a frame in the envelope with the set for future colouring, just because it seems handy.

I went around from red to yellow, blue to purple and green for the leaves. The copic colours I used are:

  • Red: R59, R29, R27, R24
  • Yellow: Y38, Y17, Y15, Y13
  • Green: G28, G09, G05, YG07
  • Blue: B23, B32, B12, B00
  • Purple: BV08, BV04, BV13, BV02

I adhered a frame to a white card base and inlaid the green leaves directly. The flowers have a couple of extra petal layers beneath the coloured ones and I really like the subtle difference in depth.

I finished off the card with a Simon Says Stamp Thanks sentiment – white shadow layer and two black layers for the intricate word die. I did use a Nuvo Black Glitter cardstock for the top layer for added sparkle.

Plus, a little sentiment strip, gems in the flower centres and little extra gems scattered around the Thanks.

This completes my pair of cards today. Thank you for visiting! Below are links to the products I have used – some are affiliate links (not all) which simply means I may get a small commission at no extra cost to you when shopping. Thank you for your support – it means I can keep creating and sharing with you.

Also, I have another post using the same Ornate Floral die where I created a beautiful shaker card here.

https://linkdeli.com/widget.js?id=f5e8378456858c916708

For more in-depth information about the best value supplies for your craft table, from cardstock to the handiest tools, check out my Best of the Basics series.

Follow me on my social media channels:

Posted on Leave a comment

Wishing You A Happy Day

I’m not usually a floral type person – I don’t even do gardening! But this new Altenew stamp and its matching die just looked too amazing to not have in my stash.

I had a go at no line watercoloring – there are so many inspiring cardmakers and artists out there showing beautiful images with this technique and I really wanted to join the trend.

I stamped the image with Gina K Whisper amalgam ink and I used Ken Oliver Color Burst powders for my painting. Colour Bursts often come in packs of 6, but your local store may have them singularly for retail.

I painted it a small section at a time – putting water down first, picking up the powder with my brush and letting the water do most of the blending for me. The flowers ended up a little darker than I anticipated, so that is something to practice next time. I spent the better part of an evening painting this image, but it was well worth taking the time!

For the card front, I used a piece of cardstock from my stash which is not quite Kraft, but not quite grey either – it’s called Concrete Grey and I found it in my local stationery store. I’ll link to it below for your reference.

I had some matte gold frames leftover from a previous project – the Altenew Fine Frames cover die cuts a bunch at one time – and I selected an appropriate sized one for this card.

I heat embossed the sentiment from the same stamp set just inside the frame. I cut the flower out with its matching die and attached it with foam tape which gives it just a little lift from the card front.

The card base is Gina K Designs Grass Green – such a delicious colour! Gold gems from Pretty Pink Posh complete the card front.

This completes my card today. Thank you for stopping by! Below are links to the products I have used – some are affiliate links (not all) which simply means I may get a small commission at no extra cost to you when shopping. Thank you for your support – it means I can keep creating and sharing with you.

https://linkdeli.com/widget.js?id=f5e8378456858c916708

Follow me on my social media channels: