
I had a brilliant day back in the classroom at Scrapbook Central today! 10 people came along to learn ink blending techniques and together, we made a cute set of Christmas Gift Tags.
ALERT: We will offer this class a second time on 14 November 2020 if you or a friend missed this! Please let Philippa at Scrapbook Central know, as we will only run this additional class if there is genuine interest. Contact Philippa directly here.
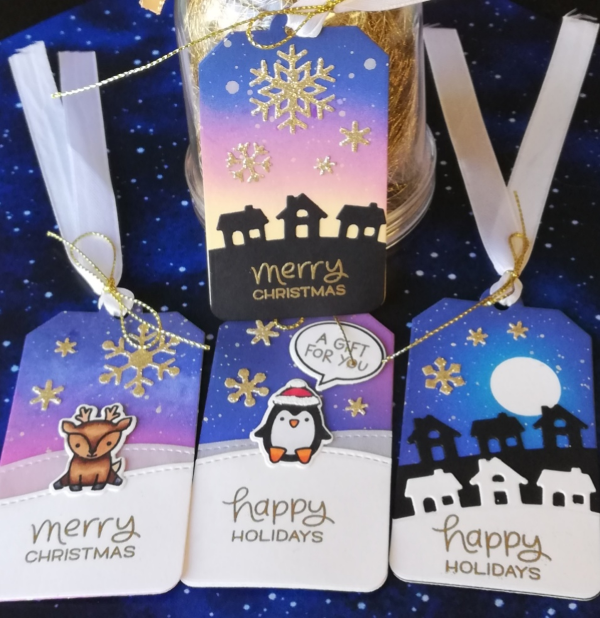
We used a small palette of Distress Oxides to ink up four different night skies, plus we added extra features to our skies with splatter, and also by lifting colour.
All products used today were from Lawn Fawn – the Everyday Gift Tag, Say What Christmas Critters, Stitched Hillside borders, the Little Town Border, and the Mini Snowflakes die set.
Check out some of the photos of the day below!


Along with the Distress Ink Combos, the class had a quick introduction to masking and colour lifting, and their blending onto the tiny spaces was stepped up for each tag – they had to blend FOUR colours onto the top half of their last tag – a challenge they all stepped up to!


After the ink blending part of the class, there was stamping, die cutting, colouring and heat embossing to be done. Even fluffy hats were made!


Check out the gorgeous tags made by all participants – everyone did an amazing job with their ink blending and even though we used the same colours, everyone had beautifully different results. Plus the added fun of splattering pigment, and revealing crisp white moons!
There were borders and images to be added for finishing, plus glittery snowflakes – aren’t they cool??
I was absolutely impressed with everyone that came along today – such enthusiasm and lovely results with their ink blends.
Promised Links
As discussed today, here are some of the links we talked about:
Ranger Ink labels – they do have a range of different ink organisation products you can download, including for Distress Inks and Oxides. Click here to visit the page.
Kristina Werner is a pro at Distress Oxide Blending, and she has a BUNCH of colour combinations for you to try out. Click here to visit her blog post for Combo Set 6 (you can search her blog for all 7 different combination blog posts, well worth the visit.
Last year’s Gift Tag Class held at Scrapbook Central, where we used Shimmer Powders and cute dies to create a set of gift tags. Plus, the Bonus blog post with further tags.
Visit my Christmas Gift Tag Pinterest Board to see other tags I have made over the past few years – there will be a bunch more added in the weeks to come as I share this year’s collection.
Bonus Projects
I also created a couple of extra projects using the same Lawn Fawn products used in class today, and here they are:
Snowy Hillside Card

I used the same blending techniques we went over in class to ink up this sky.
I stepped up the technique by adding subtle rays of light in the sky and created a full sized card to fit all the cute critters from the stamp set.


I created the rays by cutting masks from full sticky backed Post-its and arranged them to splay upwards. I carefully inked over them with the same colour blend we used in class today. I removed the masks, and repeated my inking over the top. This leaves a subtle change in colour over the sky, lighter where we had the masks, giving the impression of extra light.

I completed the card by cutting stitched hillside borders and arranged them to suit. I lifted the top two with foam tape for extra dimension.
I heat embossed the sentiment both at the top and along the bottom with gold embossing powder.
The critters are stamped, coloured and cut and placed within the hills.
I added some Nuvo Blizzard along the top edges of the hillsides and directly beneath the critters to ground them and add extra sparkle and dimension. Finally, a little fluff added to the penguin’s hat, sparkle pen to the critter’s accessories and tiny snowflakes scattered around the top half of the card.
Snowflake Circle

This time, I inked up another sky, but rather than filling the entire card front, I focused the imagery on a central circle.
I inked in stripes to try and mimic the Northern Lights, although this time I used Distress Ink rather than Oxides. You can see a difference in colour even though I used the same colour palette as we used in class.
The Mini Snowflakes set is a brilliant set where just one or two passes through the die cutting machine gets a whole bunch of snowflakes to place. I arranged the snowflakes over my circular inky piece, and trimmed the edges with scissors.

I cut the hillside border from another white circle to fit in the lowest part of the inky sky.
I wanted a few trees, and this little tree featured here is from the Lawn Fawn Home for the Holidays set – a teeny little set that has matching dies and a brilliant price point. I heat embossed the trees in gold and arranged them on the hillside.
The critters are stamped, coloured, cut and placed on the hillside – added fluff to the penguin’s hat again. Can’t resist that Neon Amplify!
To finish, the sentiment is the Lawn Fawn Happy Add-on, and I stacked the ‘Merry’ four times to bring it up to the same depth as the circular piece, also popped up with foam. The ‘christmas’ sentiment is white heat embossed on black cardstock and I added tiny dots of the Neon Amplify within the snowflakes to fill in the gaps (but did not heat them).
Say What? Tag

When the Say What Christmas Critters were released last year, this cute little tag set was also part of the release.
It cuts the tag itself, and a frame, along with speech bubble and a couple of other handy elements for your gift tag creations – all perfectly sized to match the little critters.
I simply inked the tag, added a sentiment to the speech bubble and stacked a couple of frames to give the tag a bit of depth. The penguin and his cute fluffy hat sit atop.
Shaker Tag

Now of course, with that frame option, you can create a shaker!
Shaker tags are super special and easy to make. I chose to use some bright rainbow paper I had in my stash for this one, as I have a small daughter who utterly adores Unicorns, and the associated rainbows!
Attach a piece of acetate to the back of the frame. Use foam adhesive strips on the tag around the entire edge, ensuring there are no gaps. Pop a little spoonful of confetti, sequins, seed beads, even tiny buttons can be effective shaker elements. I coloured the unicorn to match the rainbow paper, and have him/her sitting on a Lawn Fawn Puffy Cloud border inside the shaker. The possibilities are endless with Shaker Christmas Tags!
Thank you to all class participants today – it was a great day spent with you all. If you are interested in any of the products featured today, you can visit Scrapbook Central to place an order.
I’d appreciate it if you hit Follow below, and/or follow my Facebook page so you’ll be kept up to date with upcoming classes. I regularly share other cards, along with tips, hints and ideas.
Follow me on my social media channels:
For more in-depth information about the best value supplies for your craft table, from cardstock to the handiest tools, check out my Best of the Basics series. Plus, you can Tour My Craft Room!


